
Jump Clones
Feb. 8, 2013, Lyphar
Why should you get a Jump Clone? PVP (no implant loss if you get caught), different set of implants (PVP/PVE/Indust), or for fast travel to Low/0.0 Sec.
First, you MUST have Infomorph Psychology trained, one level per number of Jump Clones you want.
Second, travel to the Kador Family Station in Ghesis V - M3.
Side note: The corp officers have ground Kador Family standings for months just so you noobies can get
free JCs without standings of your own.
DO NOT TALK TO ANY OF THE AGENTS OF KADOR FAMILY.
This will ruin our standings for corp, thus I will hunt you down, kill and pod you, kick you from corp, then
gank you again, and finally let my officers have their way with your corpse.
Now that there's an understanding.
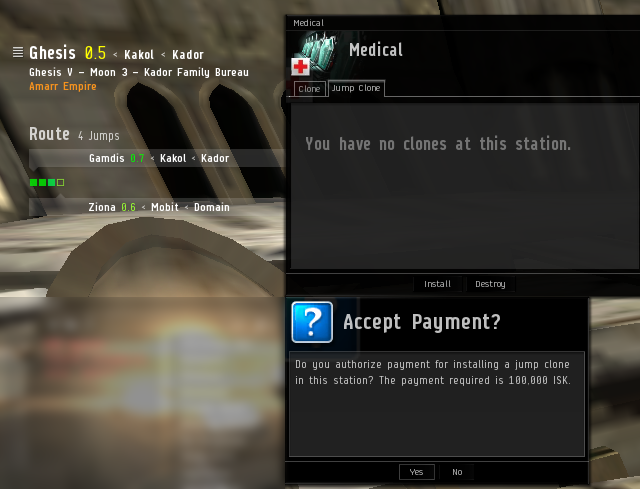
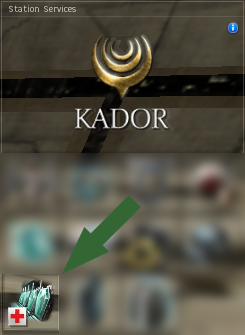
Third, open the Medical Tab on the top right.
Fourth, click the Jump Clone tab, click install, and accept the 100k isk payment.
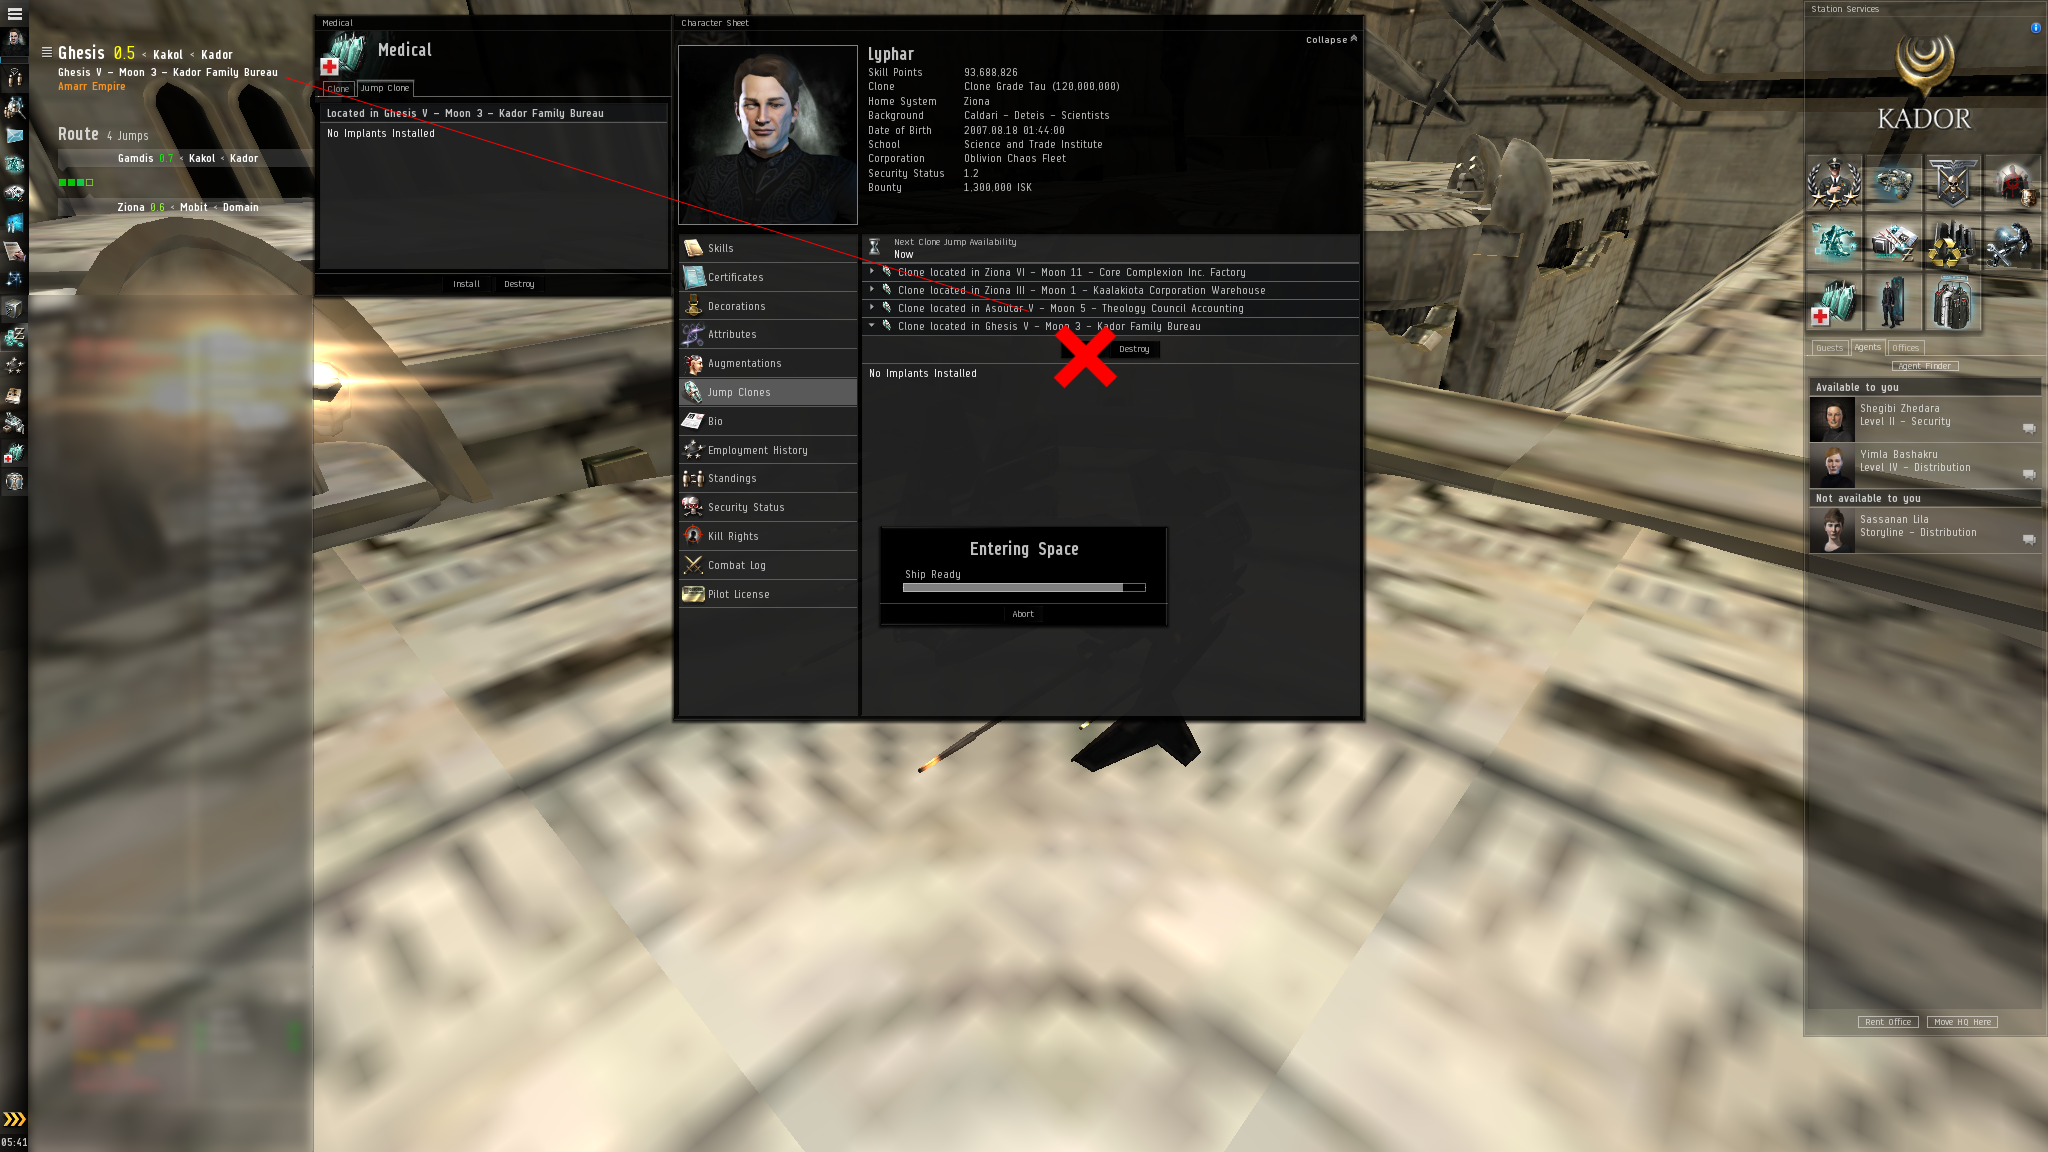
Fifth, DO NOT Jump to the Jump Clone in the same station. This will destroy your original clone and thus your implants.
Go somewhere else (pref. where you want to park your main clone).
Sixth, after you're somewhere else, jump out of your ship into a pod, and pause skill training.
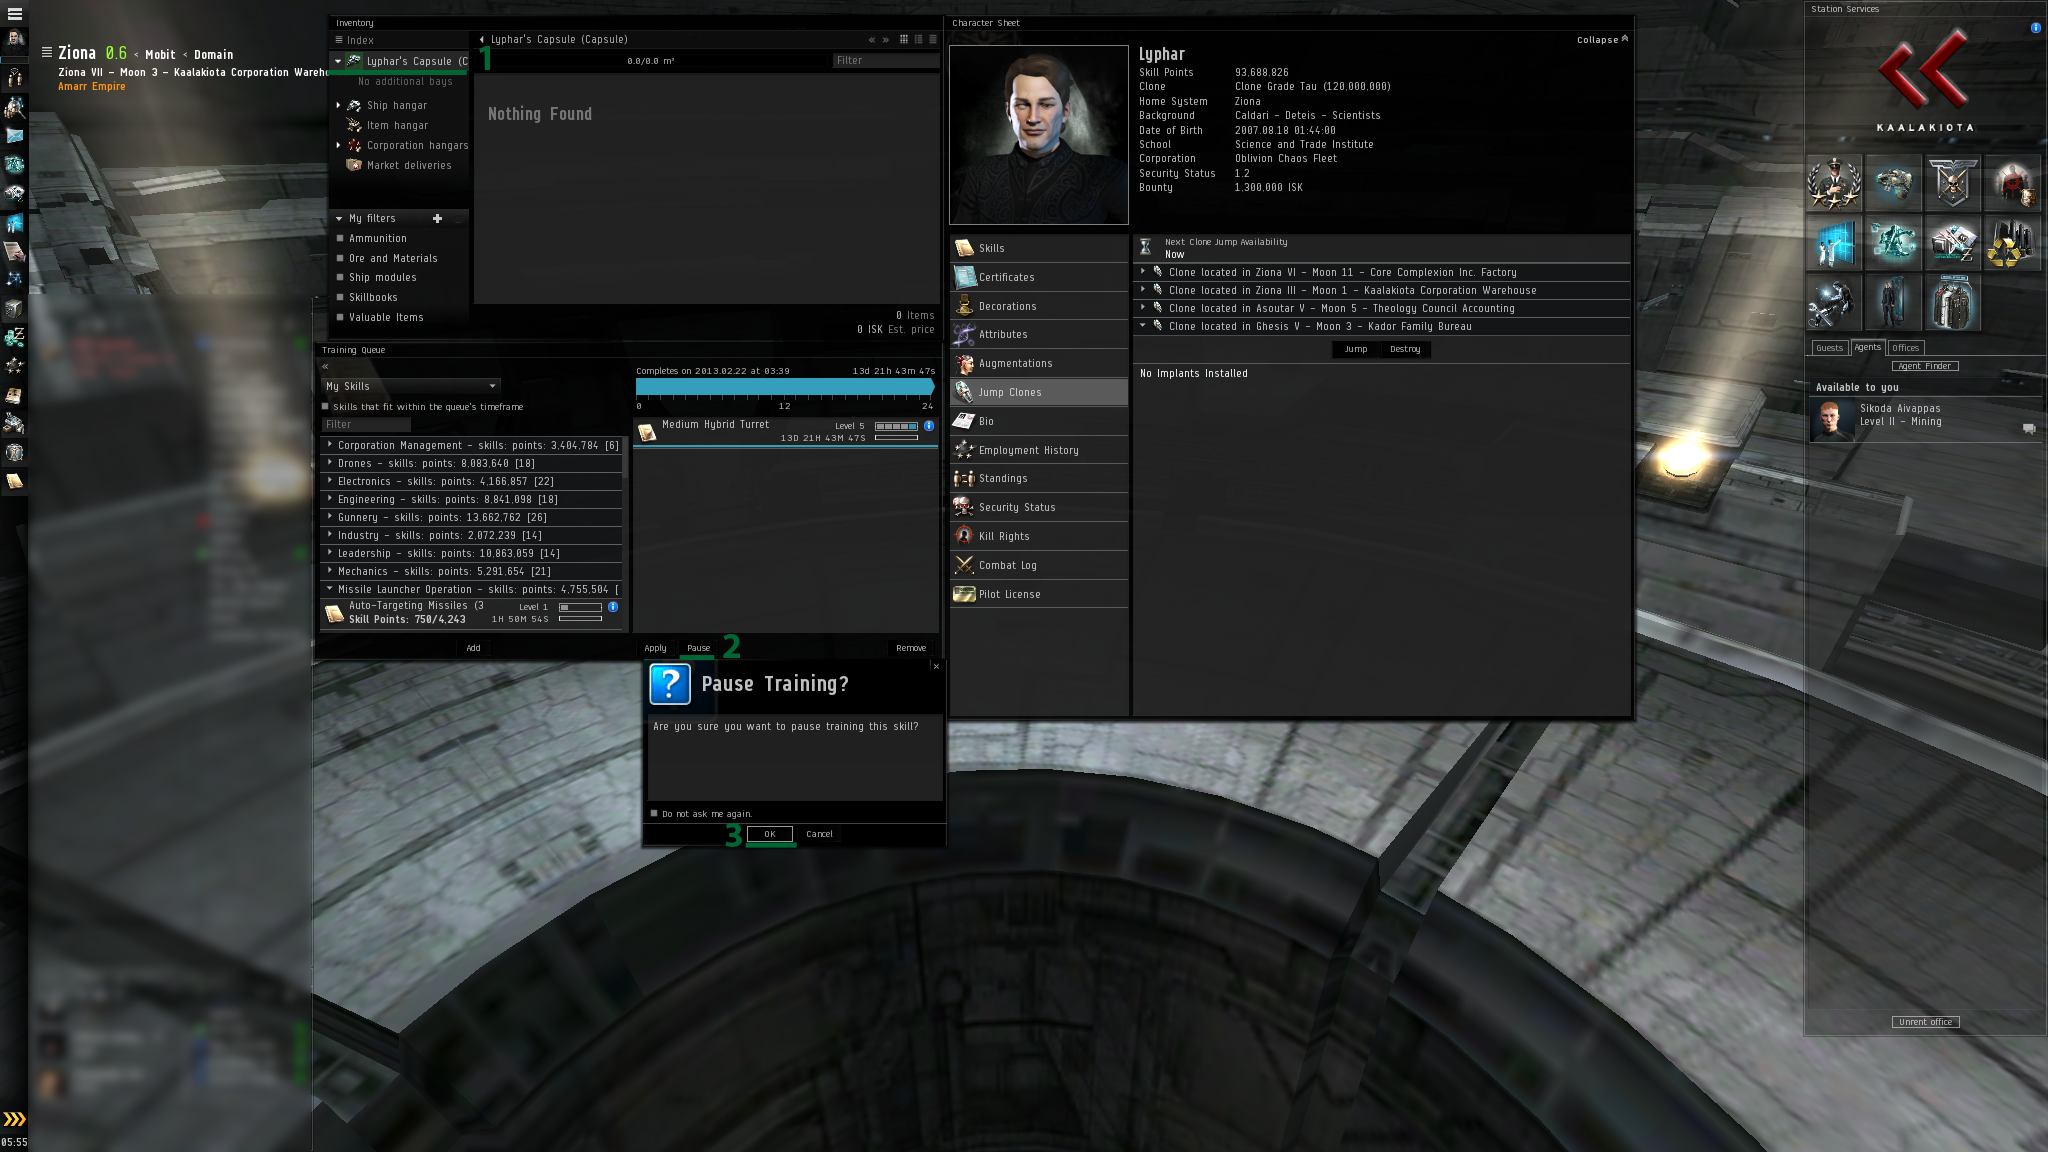
Seventh, double check you're Clone Jumping to a clone in a different station, and hit Jump.

Overview / UI Setup
July 1, 2012, Lyphar
I guess it's about time to get an updated UI setup out. Here's my current setup.


First and formost, Compact Member List on Local Chat. Right Click Local Chat and click Show Compact Member List. This allows you to squeze
more people into the member list, making it easier to scan for War Targets (WTs). I would like to thank Jason for showing me that one.
Second the way I have a tab of the Corp Hanger, Ore hold, an my cargo hold open in seperate windows is done by shift clicking windows, and moving
them to their desired location. After locked, it should reopen in the same spot (I also recommend locking windows when pinned, Main Menu, General
Settings Tab, Lock Windows when Pinned).
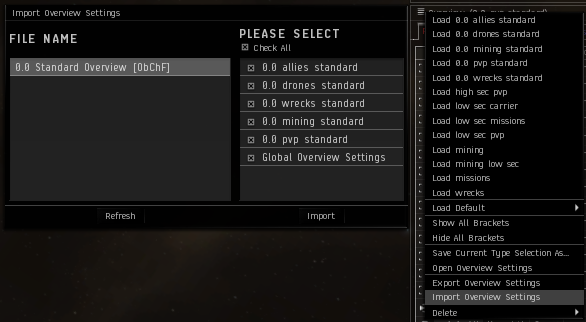
Third, setting up your Overview. This is critical for every aspect of EVE. First you'll have to import a copy of our standard overview.
0.0 Standard Overview [ObChF]
Right click and save target as to:
C:/users/%USERPROFILE%/documents/EVE/Overview/
If the folder does not exist, you'll have to create it.
Now click the 4 barred icon on overview and click import overview settings.
Next you want to setup your various tabs.
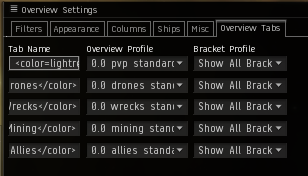
You want to set your names as <color=red>PvP</color>, <color=orange>Drones</color>, <color=yellow>Wrecks</color>,
<color=green>Mining</color>, and <color=lightblue>Allies</color>, and set the Overview Profile to the according tab.
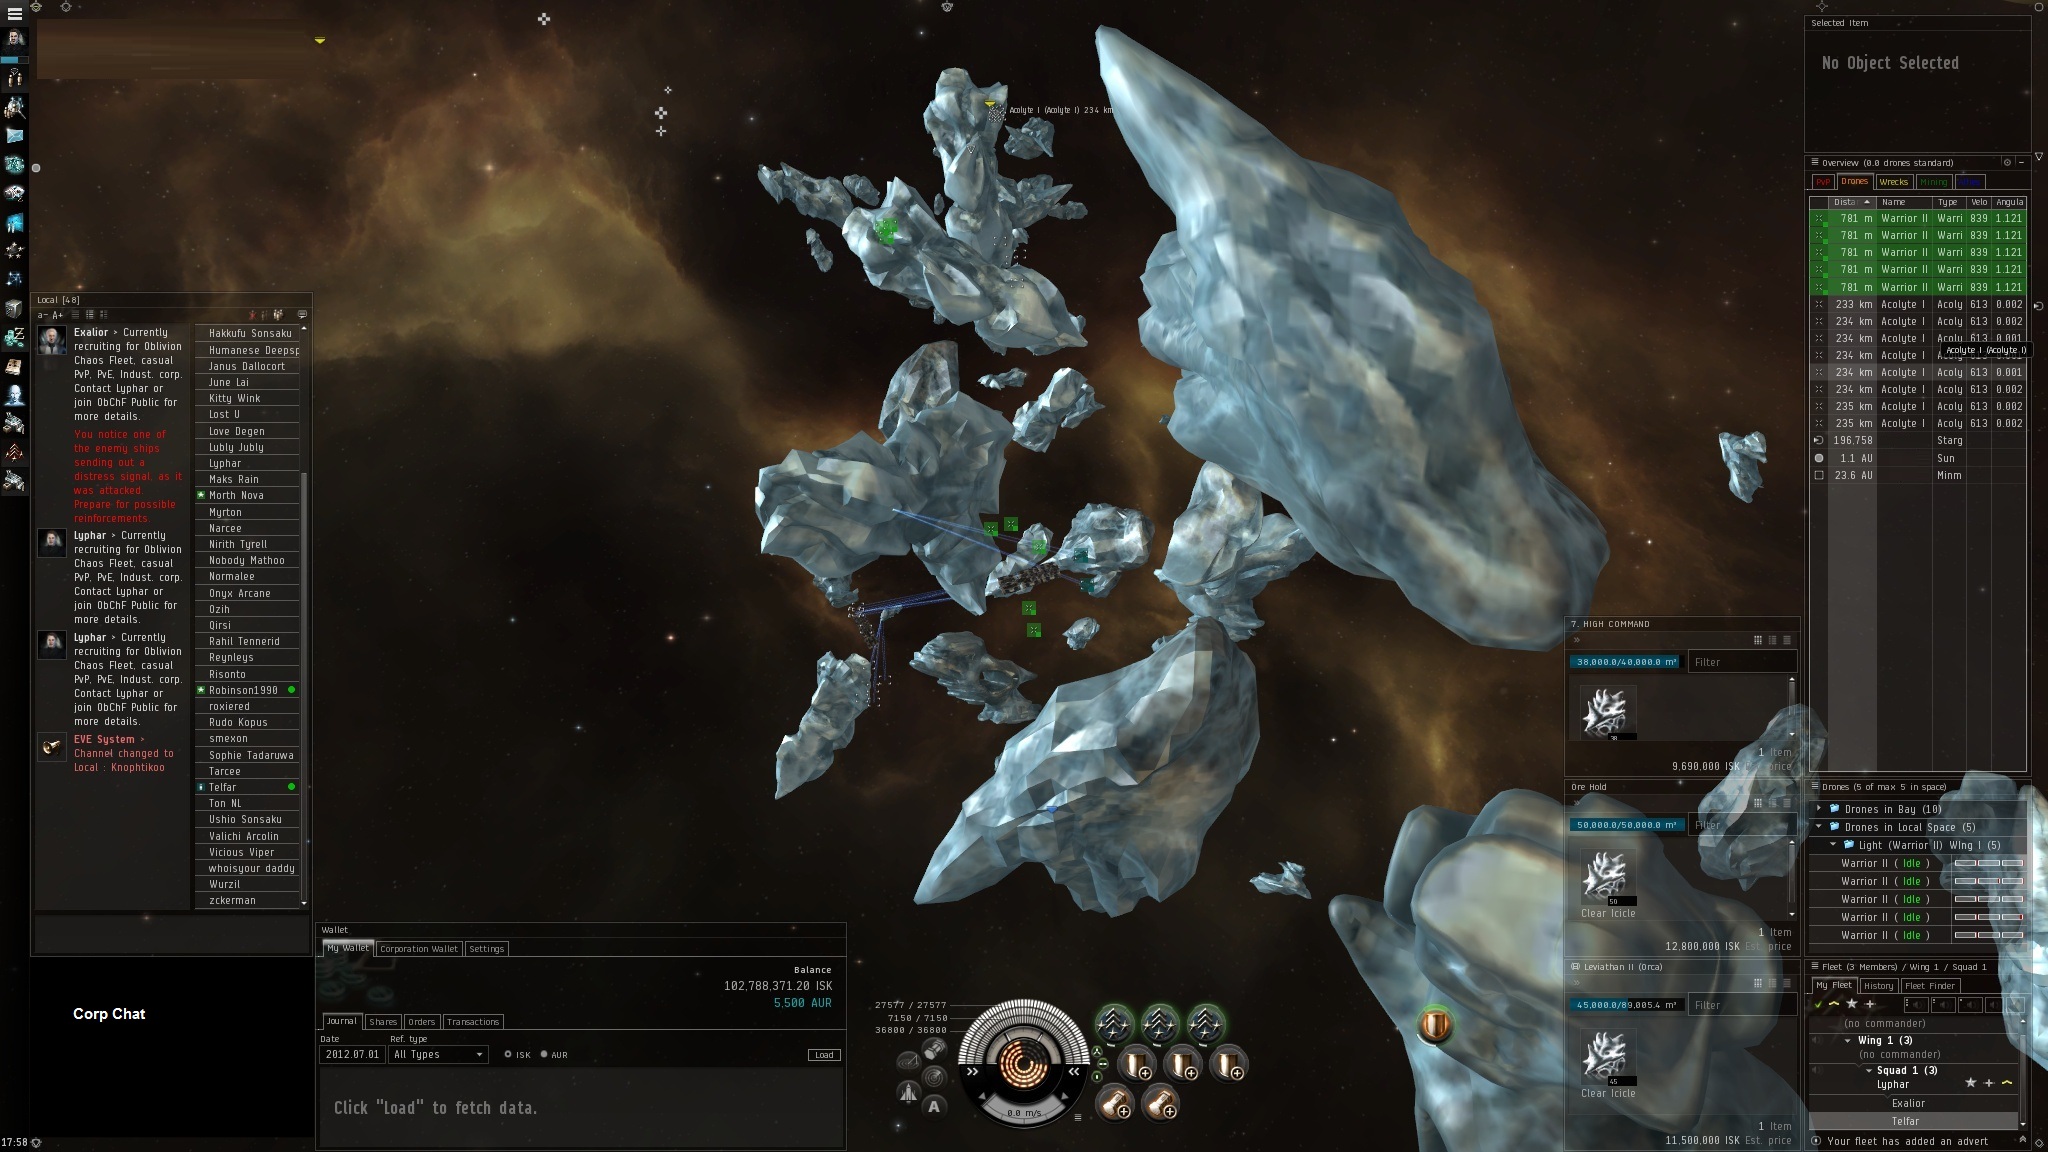
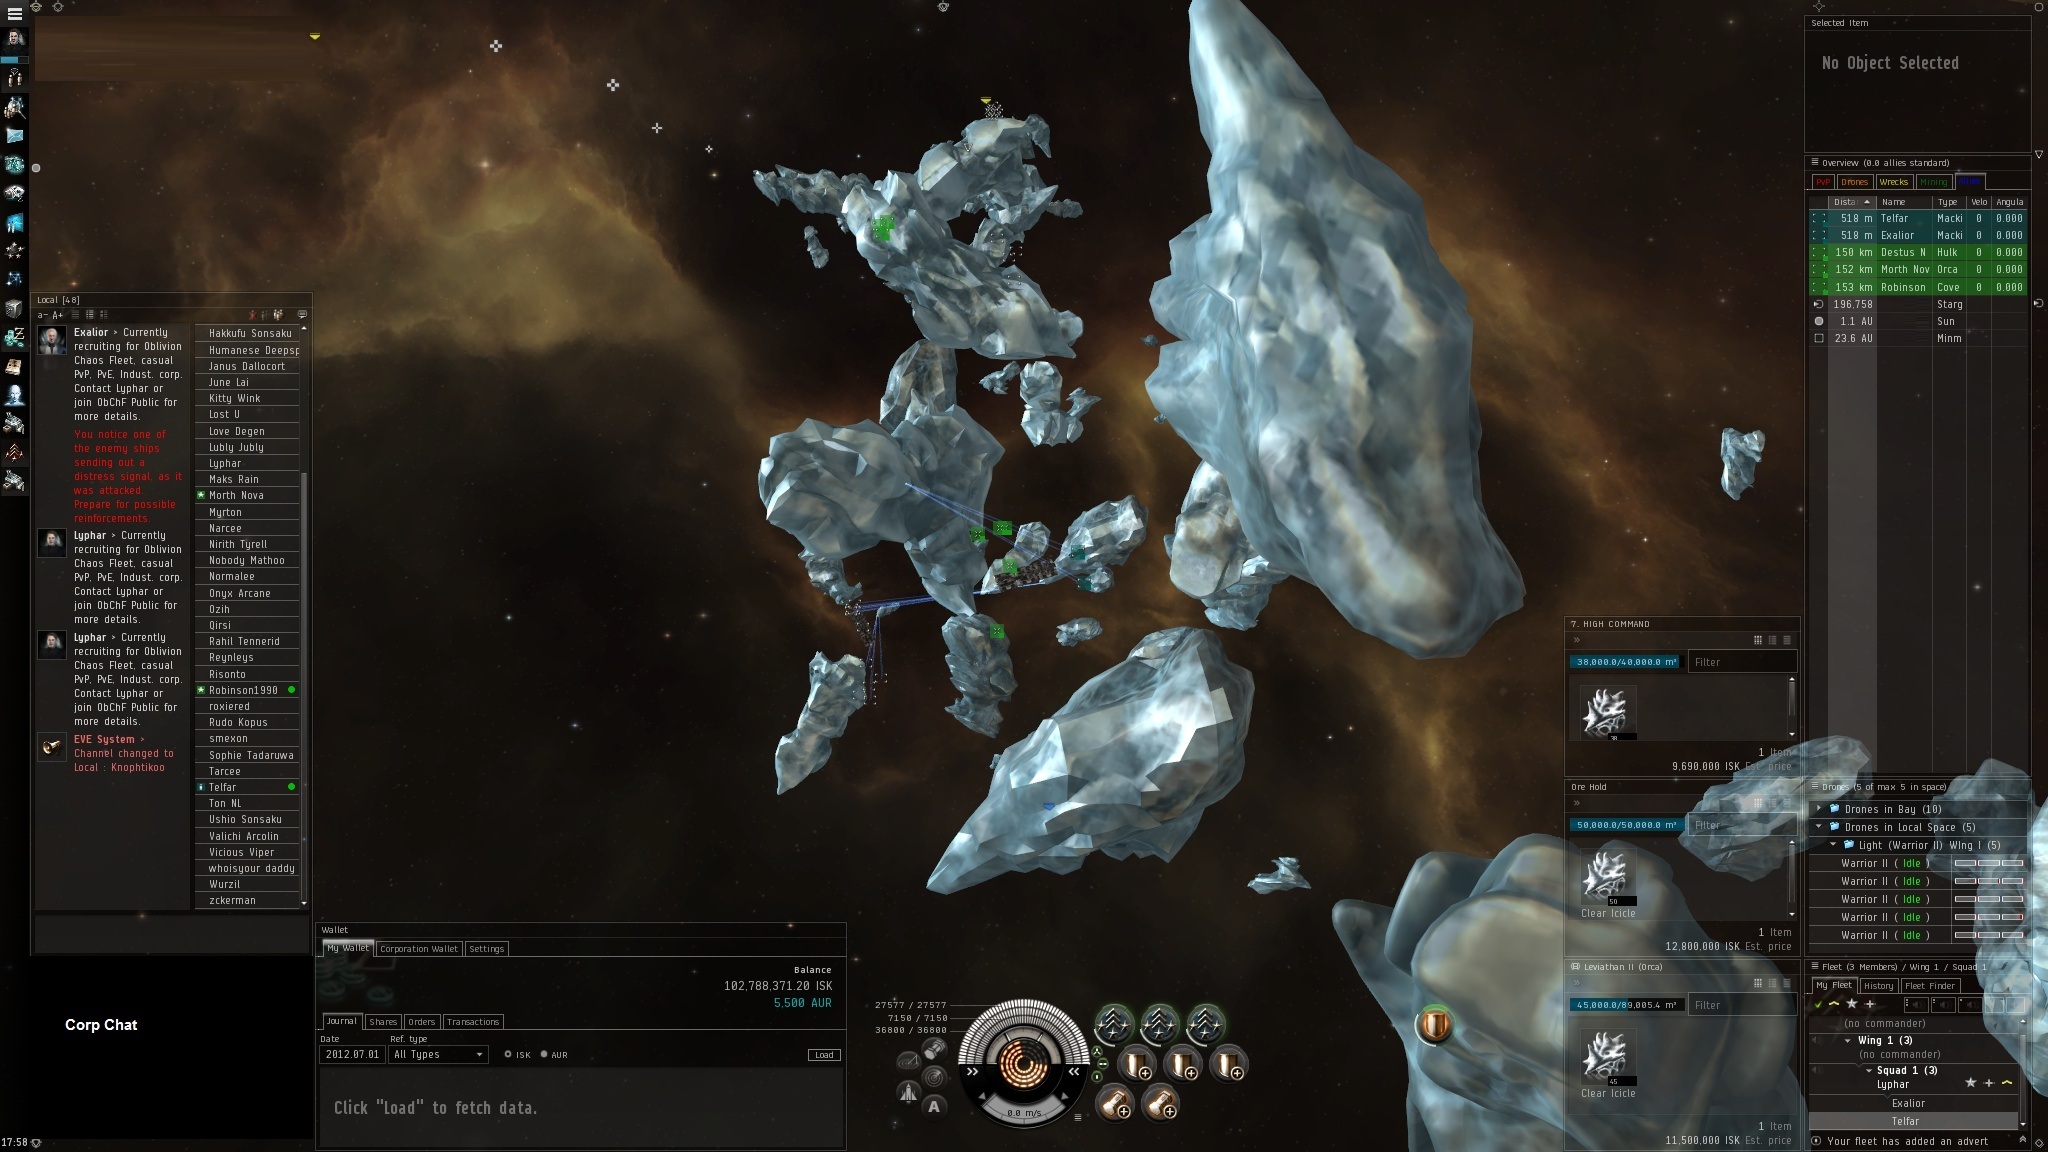
Next you'll want to set your columns.
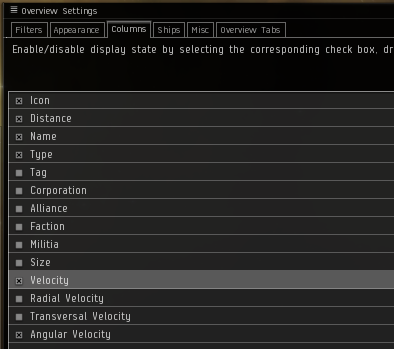
You want to set Velocity and Angular Velocity, and compress your distance, name, and type columns, as well as velocity, such that everything fits.
Look at how I have set mine in the first 2x screenshots. Now velocity and angular velocity are useful to know how fast something is aproaching,
orbiting, or moving away from yourself.
Next you'll want to set your colors. Appearance tab, Color tags.
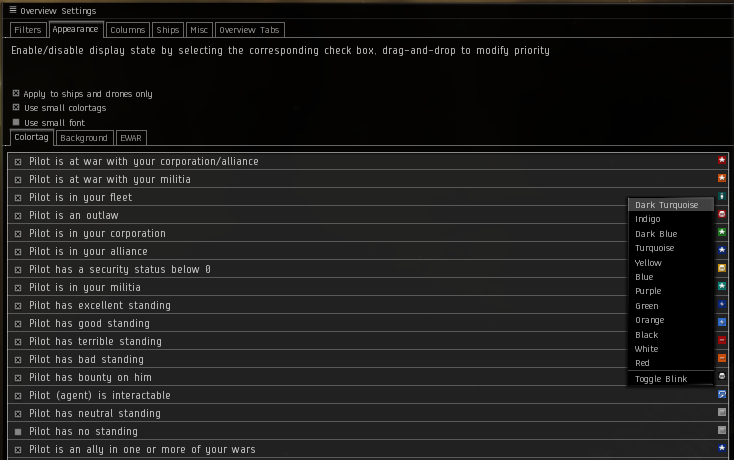
I reset Fleet members to dark turquoise (right click Pilot is in your Fleet), such that fleet members look similar to corp members and allies, and
less like targets.
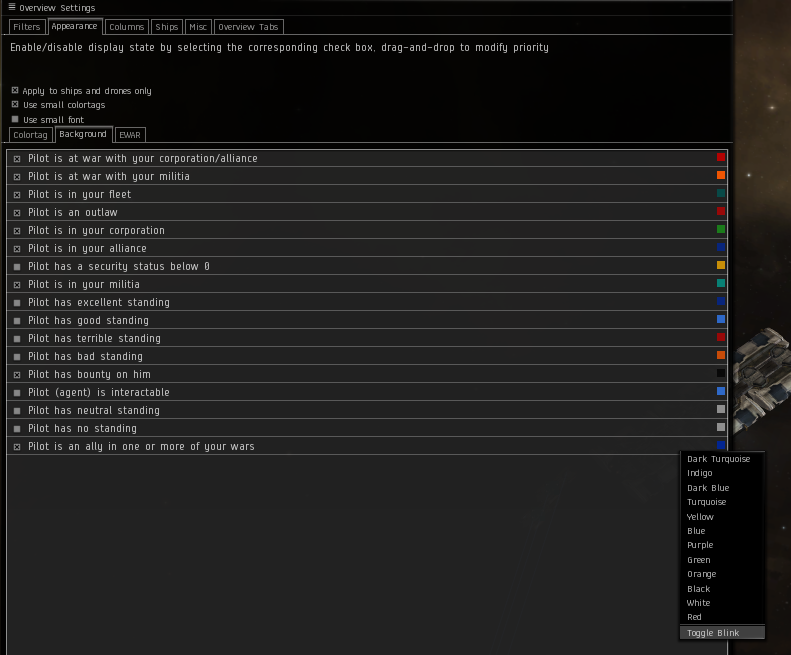
Now under Backgrounds tab, I unchecked "Pilot has a Security Status below 0" and toggled blink on allies in war.
All filters should be set, such that allies will not show up in the PVP tab and only the essentials for each tab are shown. You guys are welcome to
tweek what I've provided, but this should help prevent friendly fire incidents and Concord.
Crash Course Pt. 4 (Lessons from War)
July 1, 2012, Lyphar
We've been nearly continuously under seige by larger corporations, and yet have come out ahead. While the enemy station spun most of the
war, while our members continued to do what they wanted, hunting targets, mission running, and making isk.
1. Name your ship
If you don't name your ship, you can quickly be seen on directional. Was only a matter of time till I found the bestower afk mining in belt.
Bestower Killmail
POD Killmail
2. Be flexible
There are ways to still make isk even when enemies are hunting for you. Ninja mining while closely watching local can be very effective,
plexing and exploration of areas normally cut off without a probe launcher, even PI doesn't take anything but remote starting harvesters.
This includes tactics for PvP. As the enemy did outnumber us, normal fleet combat would not work when our corp was flying solo. Thus solo
ganks vs targets away from support became very effective. Generally this meant flying lightwieght ships that could blow past blockades in
order to make it to hunting grounds. Bigger is not always better, and if you don't have the combat skills to fly/support larger ships, you
should not even be flying the ship for PvE. Allied miners learned this lesson the hard way.
3. Be accurate
Make sure that you get a copy of the standard ObChF Overview. This will be setup so that allies do not show up in the PvP tab. I will go
into greater depth with this in a seperate tutorial on how to adjust your overview. We had serveral instances where players accidentally fired
upon allies, stations, or other objects by being too trigger happy and not checking their targets before firing. If you aren't suicide ganking,
reset your warning to warn when concord will be involved ("Proceed with this Dangerous Act").
4. Use scouts
Scouts, whether neutral or cloaky, are VERY valuable. Knowing where gate camps are, where targets are, enemy movements are, ect. is essential
for avoiding when moving large industrial ships around, or when looking for proper engagements with fleet. Neutral scouts can also be easily
identified if not used properly. Again use your common sense, don't use one scout to follow directly behind an enemy fleet or sit outside a
station with targets, without a cloak.
That's about all the notes I have atm. I am proud of all of you that fought in this war. We proved that numbers aren't everything, it's skill.
Cynosural Field Generators and Proper Placement
March 2, 2012, Lyphar
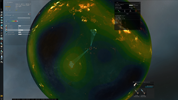
Capital Ships are an exciting part of endgame and are very valuable resources to have. The unfortunate part is that these massive
ships are too large to fly through stargates. They require a cynosural field generator (cyno for short) "lit" at the destination point.
This cyno acts as a beacon which capital ships' jump drive locks onto. Cynos use 500-250 units of liquid ozone per cycle and a cyno ship is
trapped in position for 10min (don't forget to deactivate the cyno if you have more than one jump's worth of fuel). The problem is that it
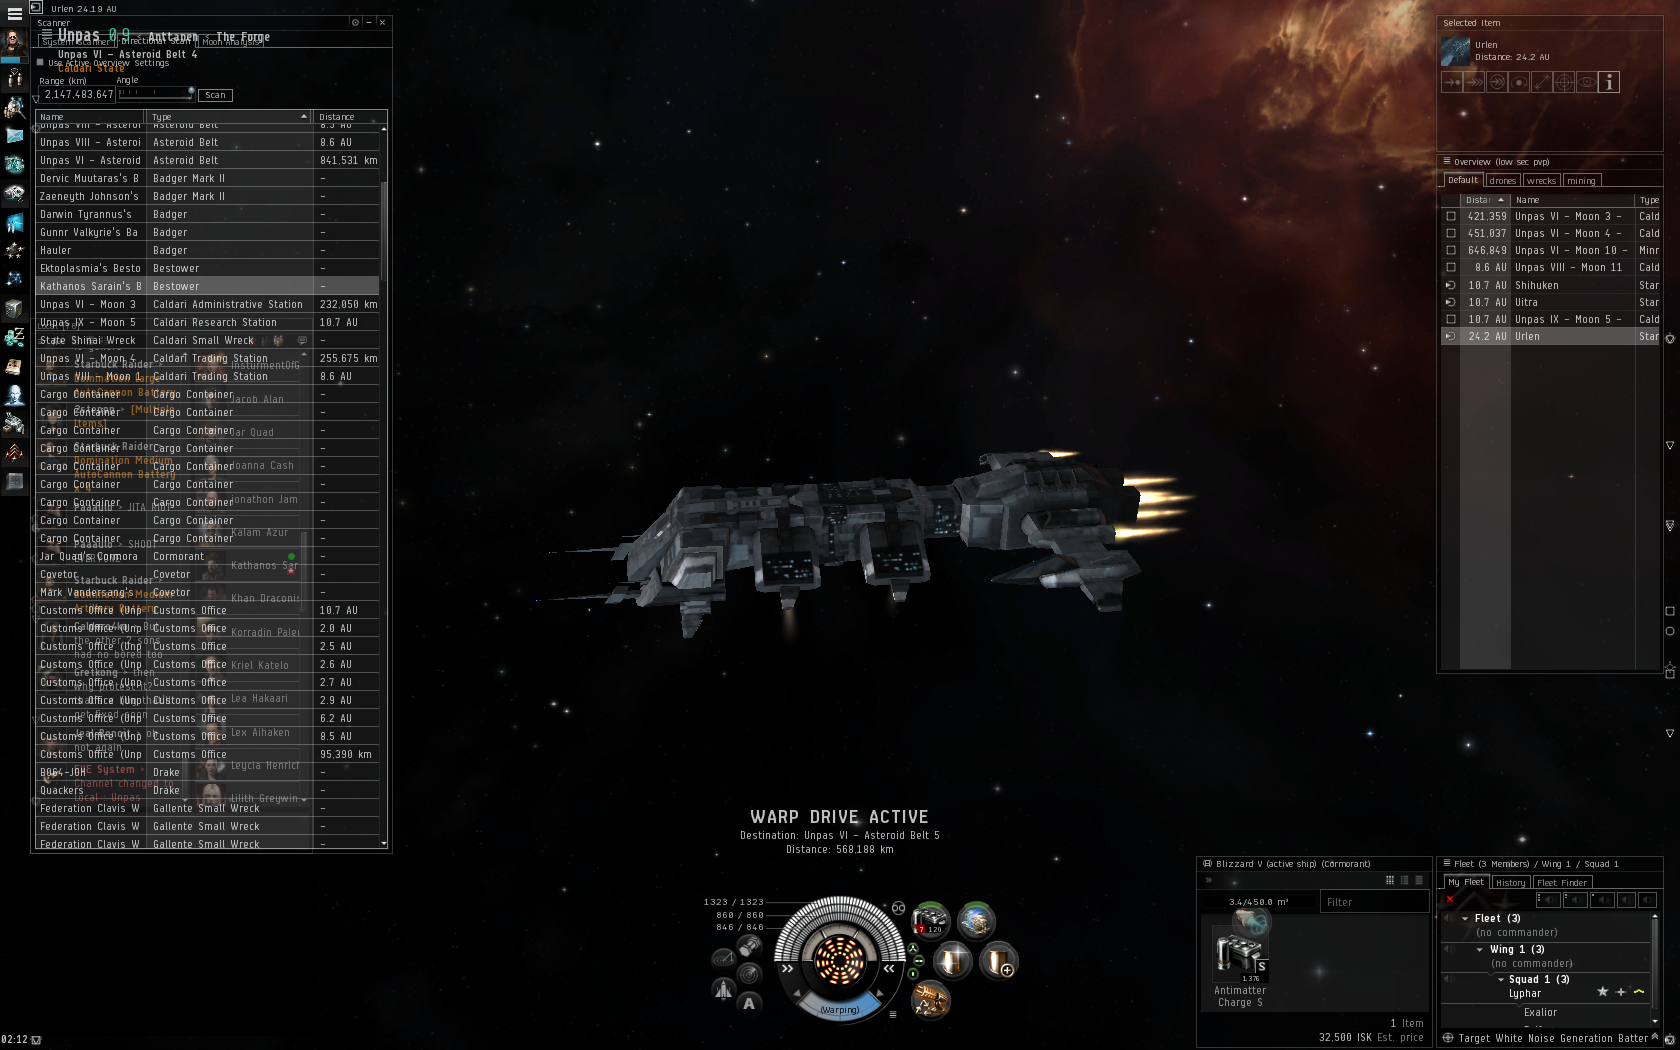
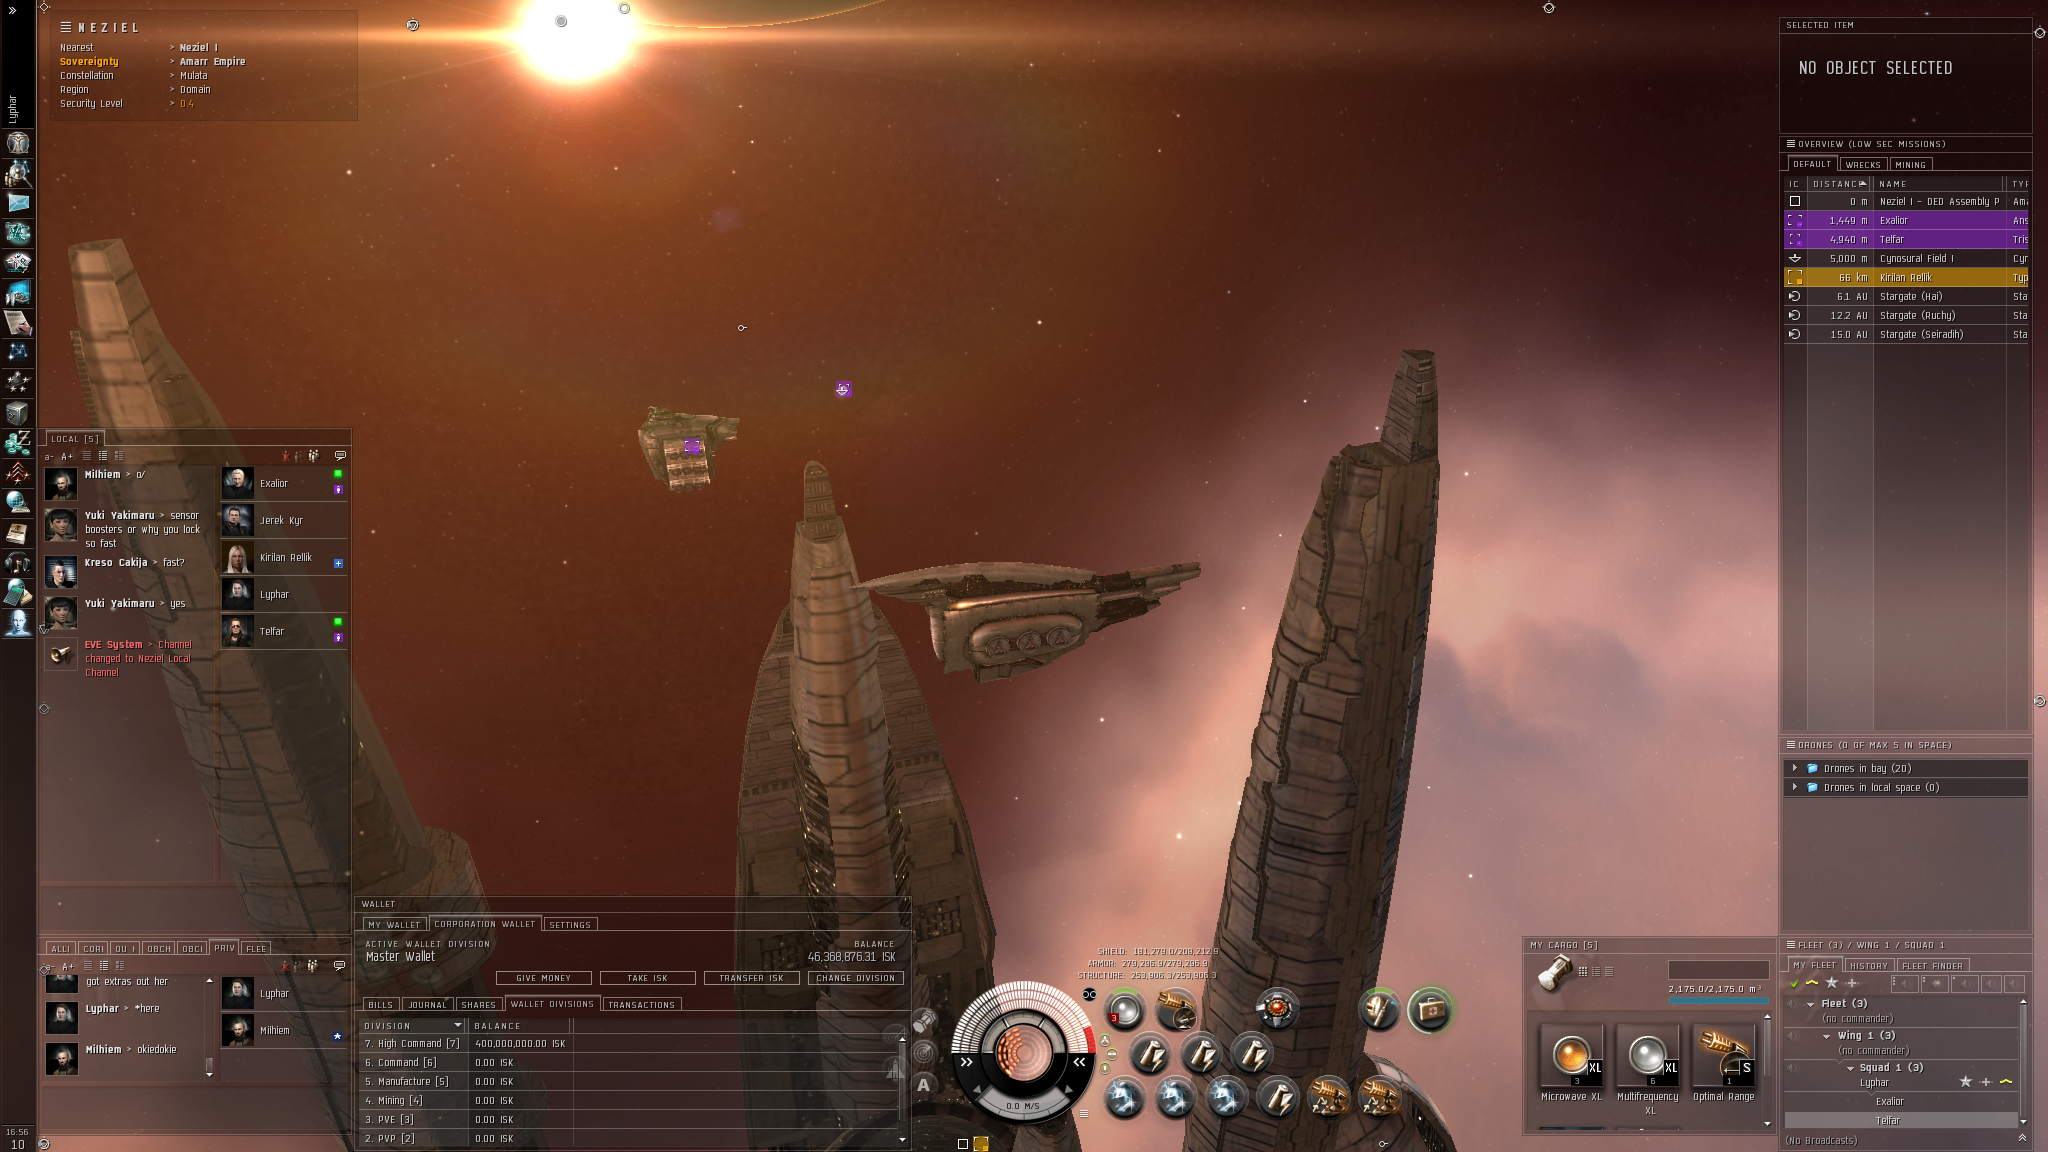
requires a player to be in position at the destination. If the cyno player lights the cyno too close to station, when the capitals jump,
they may jump into the station. With collision settings in EVE this causes the capital ships to go careening off into space, normally 20+
KM from docking ring. This leaves the capital open and vunerable to attack. Fortunately on most stations there are safe points to place
cynos in which the entire range of the cyno (a 6.5km spherical range) within the docking ring.
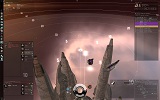


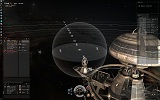
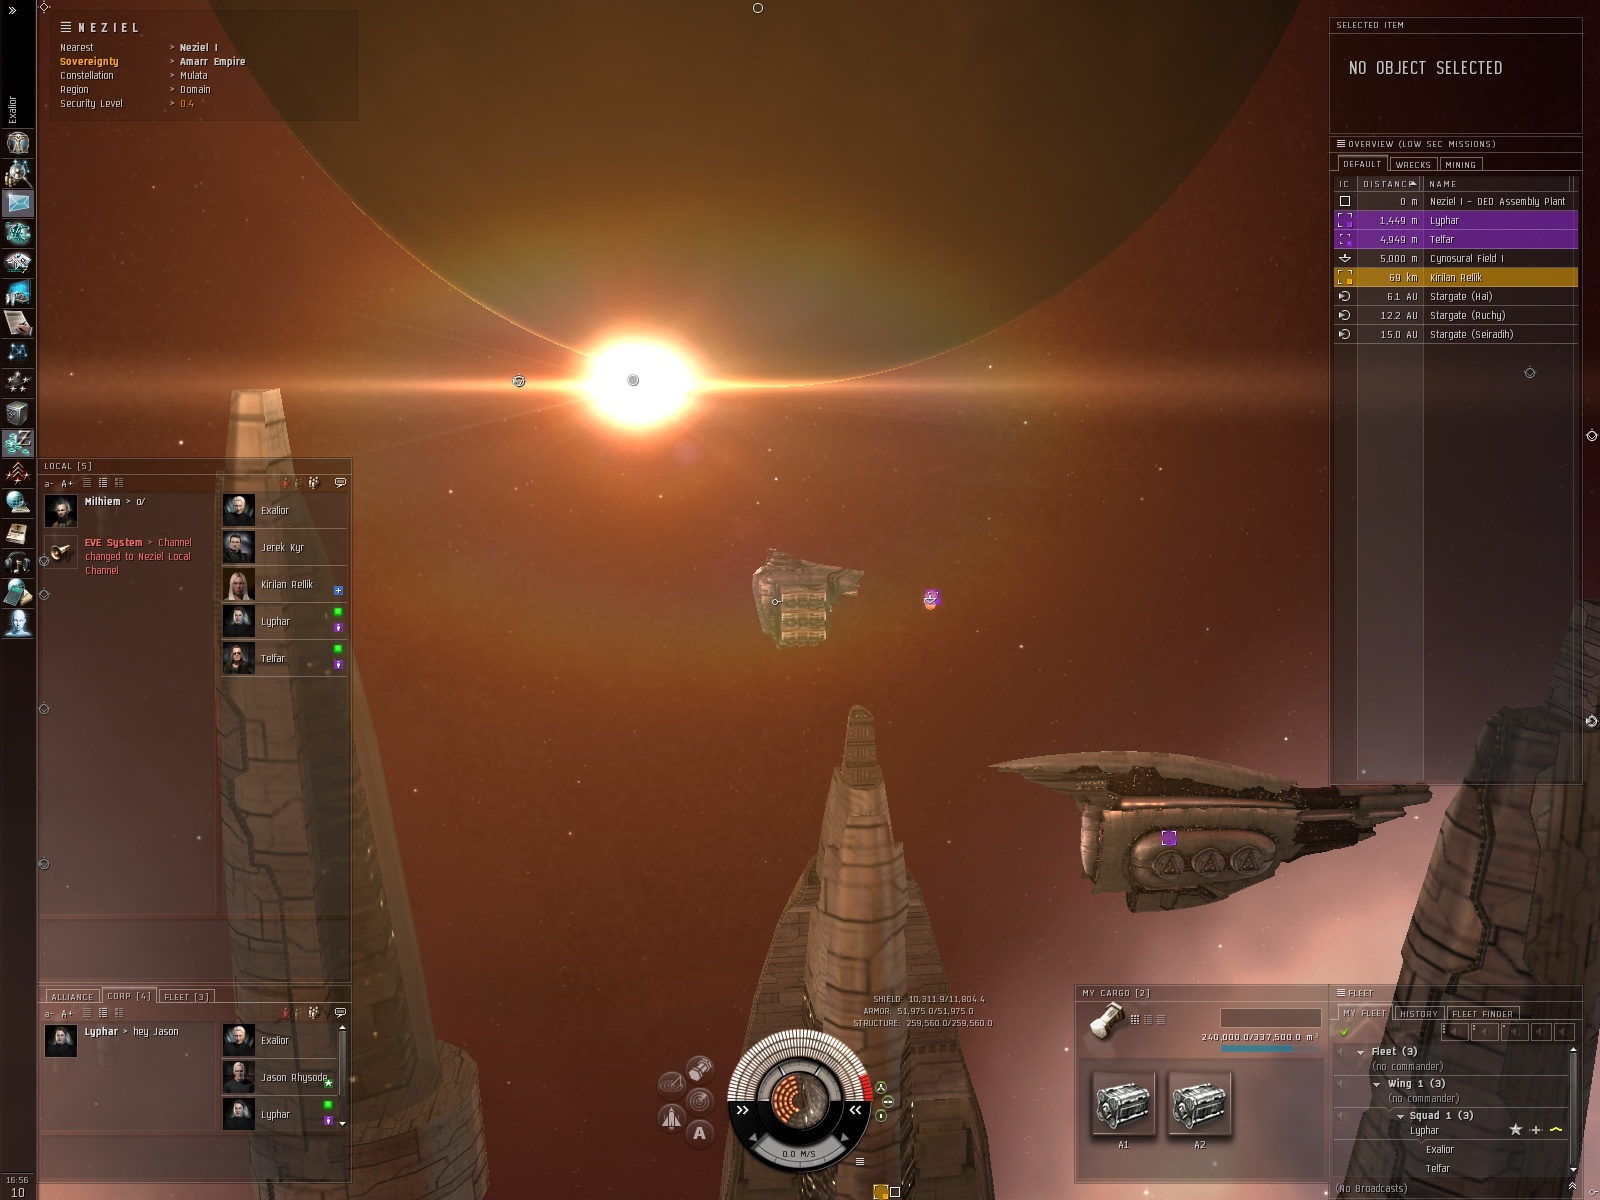
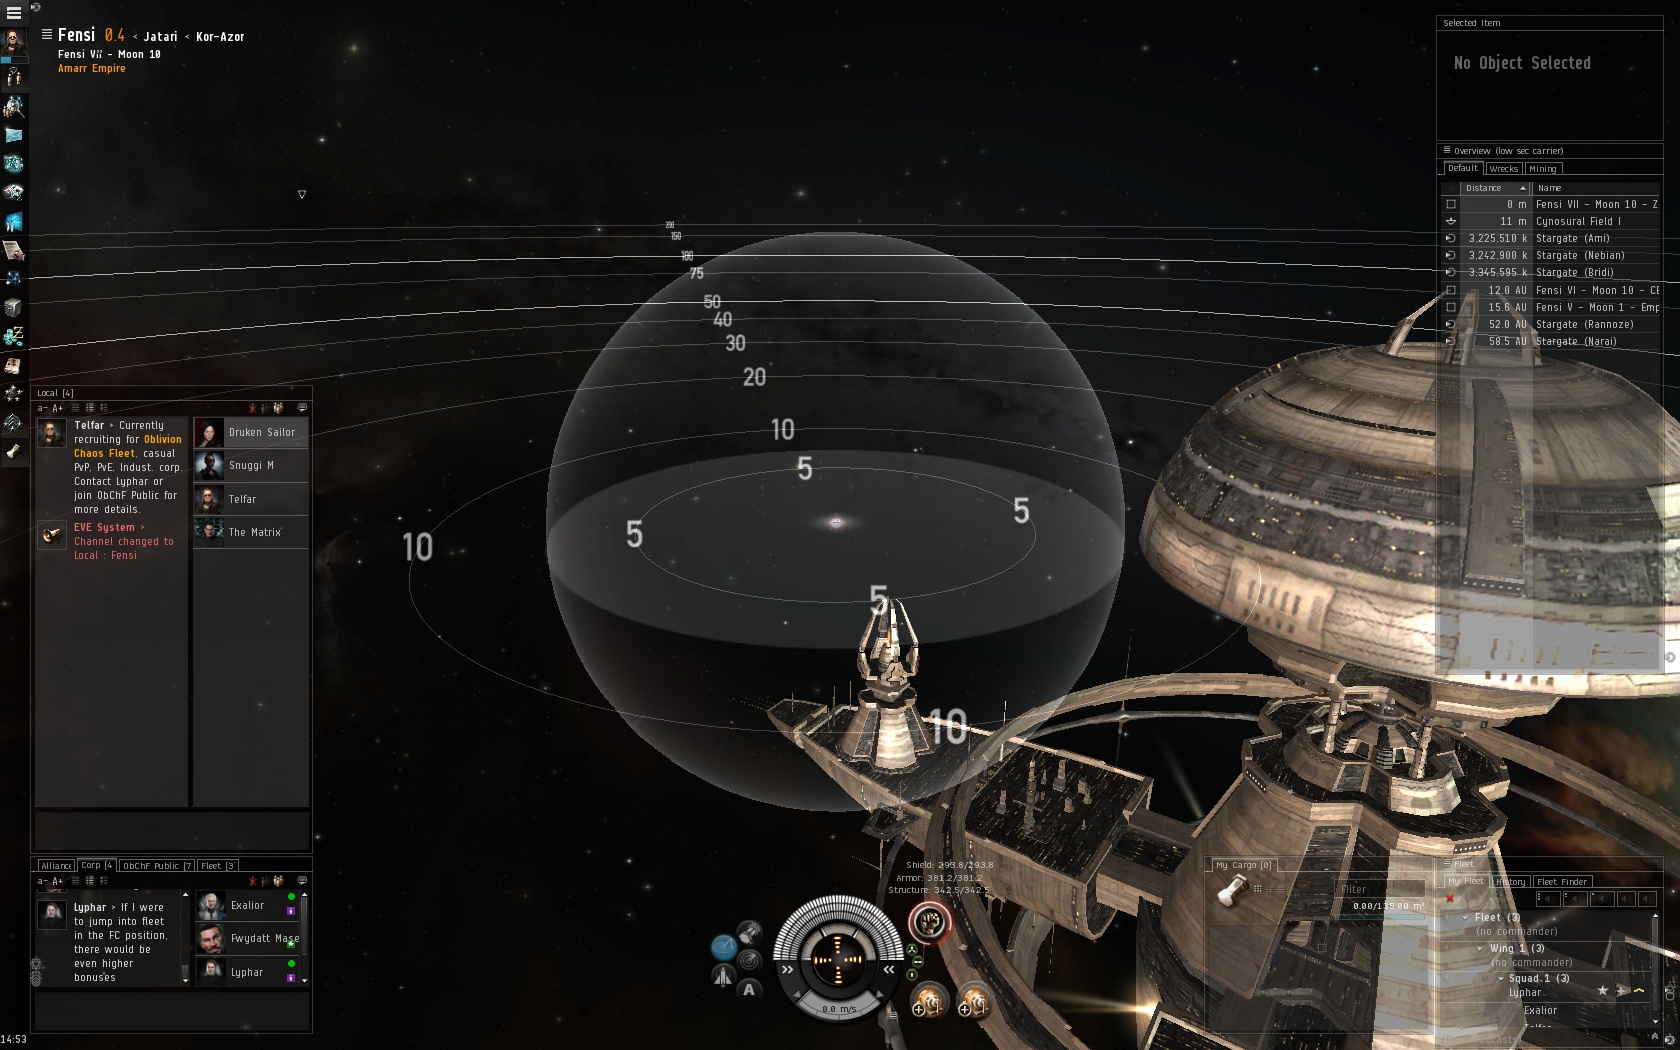
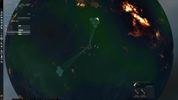
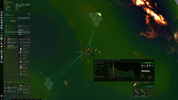
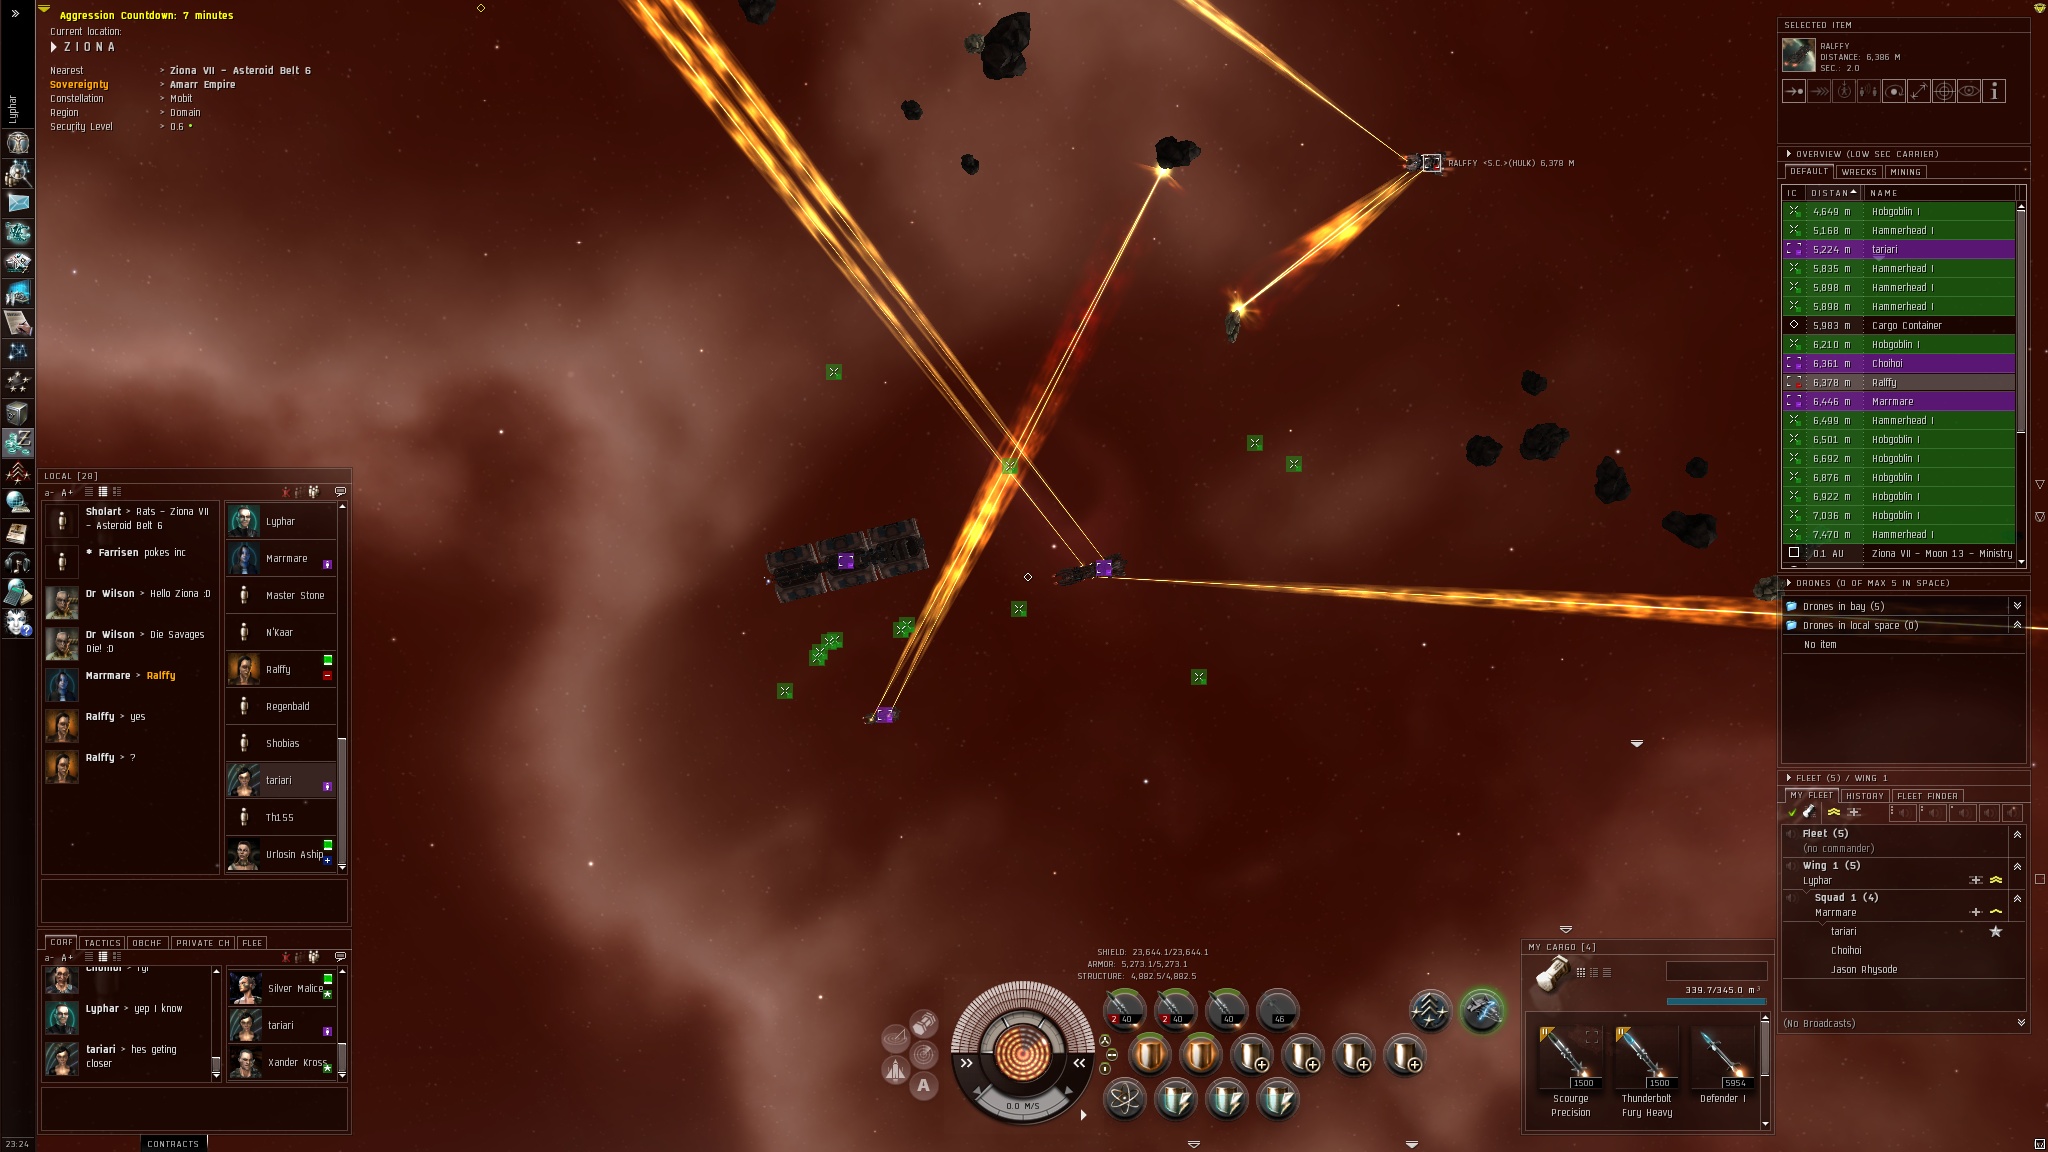
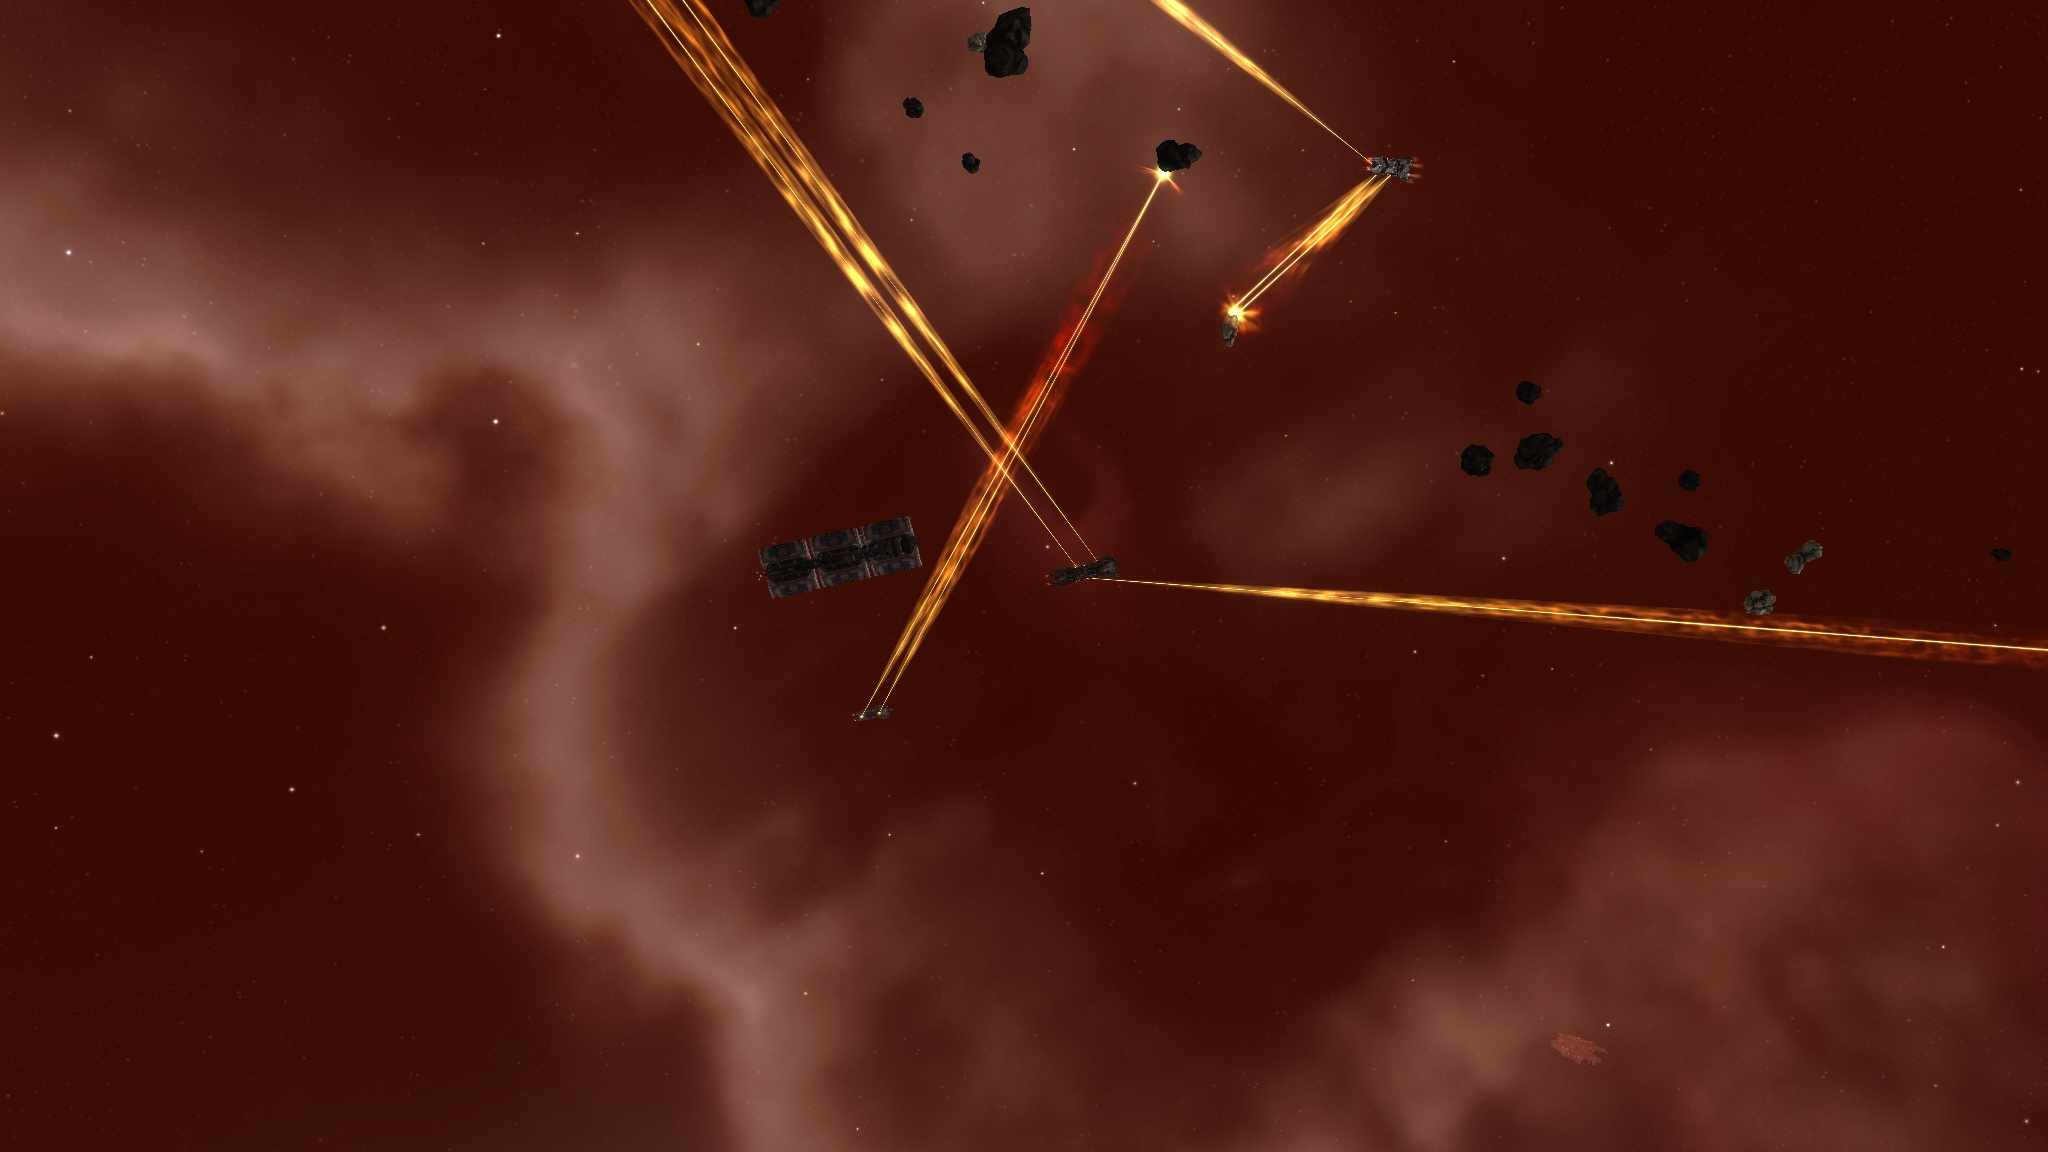
The above screen shots are the various views from a successful jump with a JF (Jump Frieghter) and a Dreadnaught (Dread). The range shows
up by activating the tactical overview (center bottom console, left side, or ctrl-d). If you are nervous about the jump range, have another
player or alt come out and orbit the cyno at 5km. Now on the station we jumped to, there were pilons which extended the docking range above
the station, but the range of the cyno bubble could be moved inbetween them.

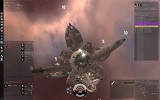
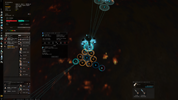
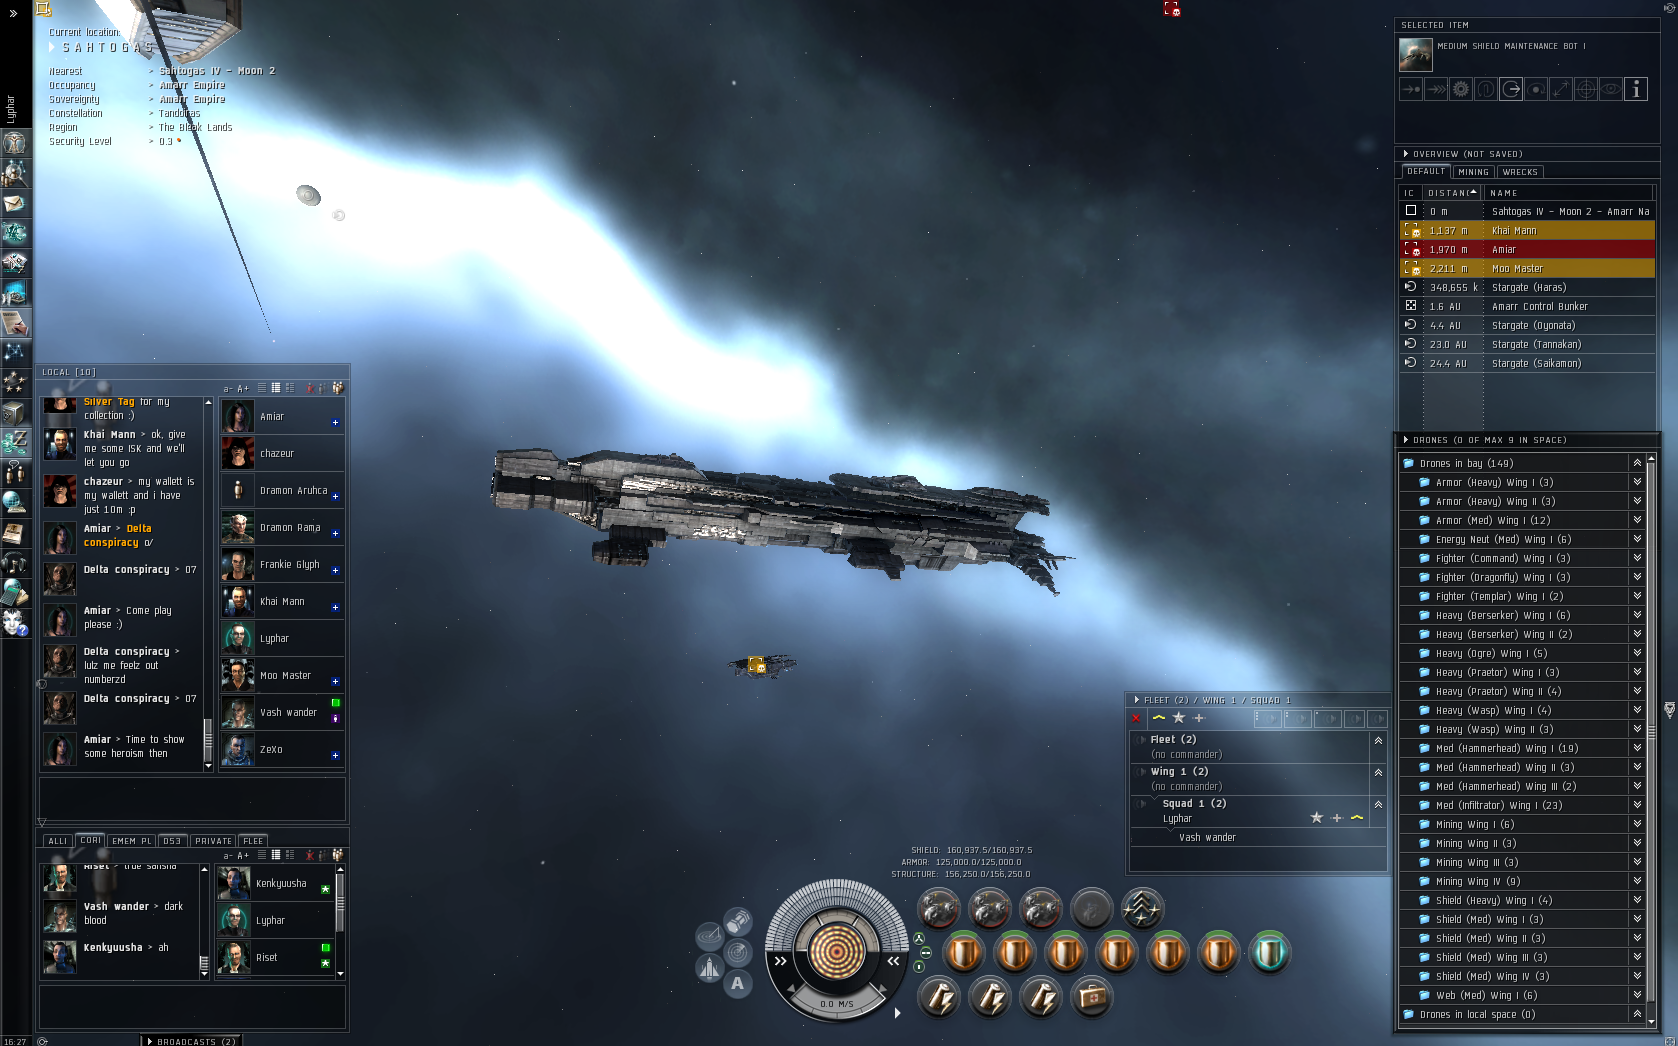
Similar senario at a different style Amarr station. This is an Amarr industrial stations with pilons comeing out of the sides of the station.
These screenshots show the jump range from the cyno's center location.
Last important point of what to use for cyno boats. Generally a cyno boat is disposable (6mil with cost of cyno vs 700+ mil for a cap) and thus
a basic frig with just a cyno and fuel is used. If the cyno is traversing difficult or hostile territory, stabs and MWD can be used. The exceptions
to this would be recon ships (which can light a cyno for half the time and half the fuel), bait ships, or covert cynos (more about those later).
Planning a Jump? Use the ICSC Jumpplanner (link on left menu on site).


Planetary Interaction Tutorial
Updated July 17, 2011, Lyphar
Planetary Interaction or Planetary Colonies can be extremely profitable or extremely helpful if setup properly. Planetary
Interaction (PI) builds components needed as fuel for POSs and for various T1/T2 BPOs. Keep in mind what POS use the most of
and what is the most complex item to make with PI colonies. List of Fuel requirements for a Large Amarr Tower (of PI components)
per hour are as follows:
* 4x Enriched Uranium
* 25x Oxygen
* 5x Mechanical Parts
* 8x Coolant
* 1x Robotics
Now, Robotics are made from Mechanical Parts and Consumer Electronics, so Mechanical Parts as well as Robotics tend to make the most
and are always in shortest supply. Second would be coolant.
Only planet that can make Enriched Uranium, Consumer Electronics, Mechanical Parts, and Robotics on the same planet are Plasma Planets. Storm and Gas
Planets can be setup for Coolant and Oxygen production. A WH with a Plasma planet and a storm or gas planet can support the WH
POS indefinately except for the ice based fuels with enough colonies.
After you have found a planet that does what you need it to, you need to scan the planet for the most desireable location to setup.
If there is already a colony in the location that you'd prefer, I'd recommend another location on the planet since 2x colonies
extracting the same materials will negatively affect one another.
General colony setups go as such:
[extractors -> storage (Launch Pad 1) -> Basic Industry Facility (refinery)]x2 -> storage (Launch Pad 1) -> Advanced Industry
Facility (manufacture) -> Launch Pad 2 (temp. storage)
Using the launch pads as storage instead of storage facilities gets you double the storage capacity for the same power grid
(power grid normally runs out before CPU). Thanks to Jachire for discovering this advantage.
In order to do this you must have lvl 4 or 5 command centers.

Two sets of extractors sub-process in order to get the materials for items that require two mats. I shall be
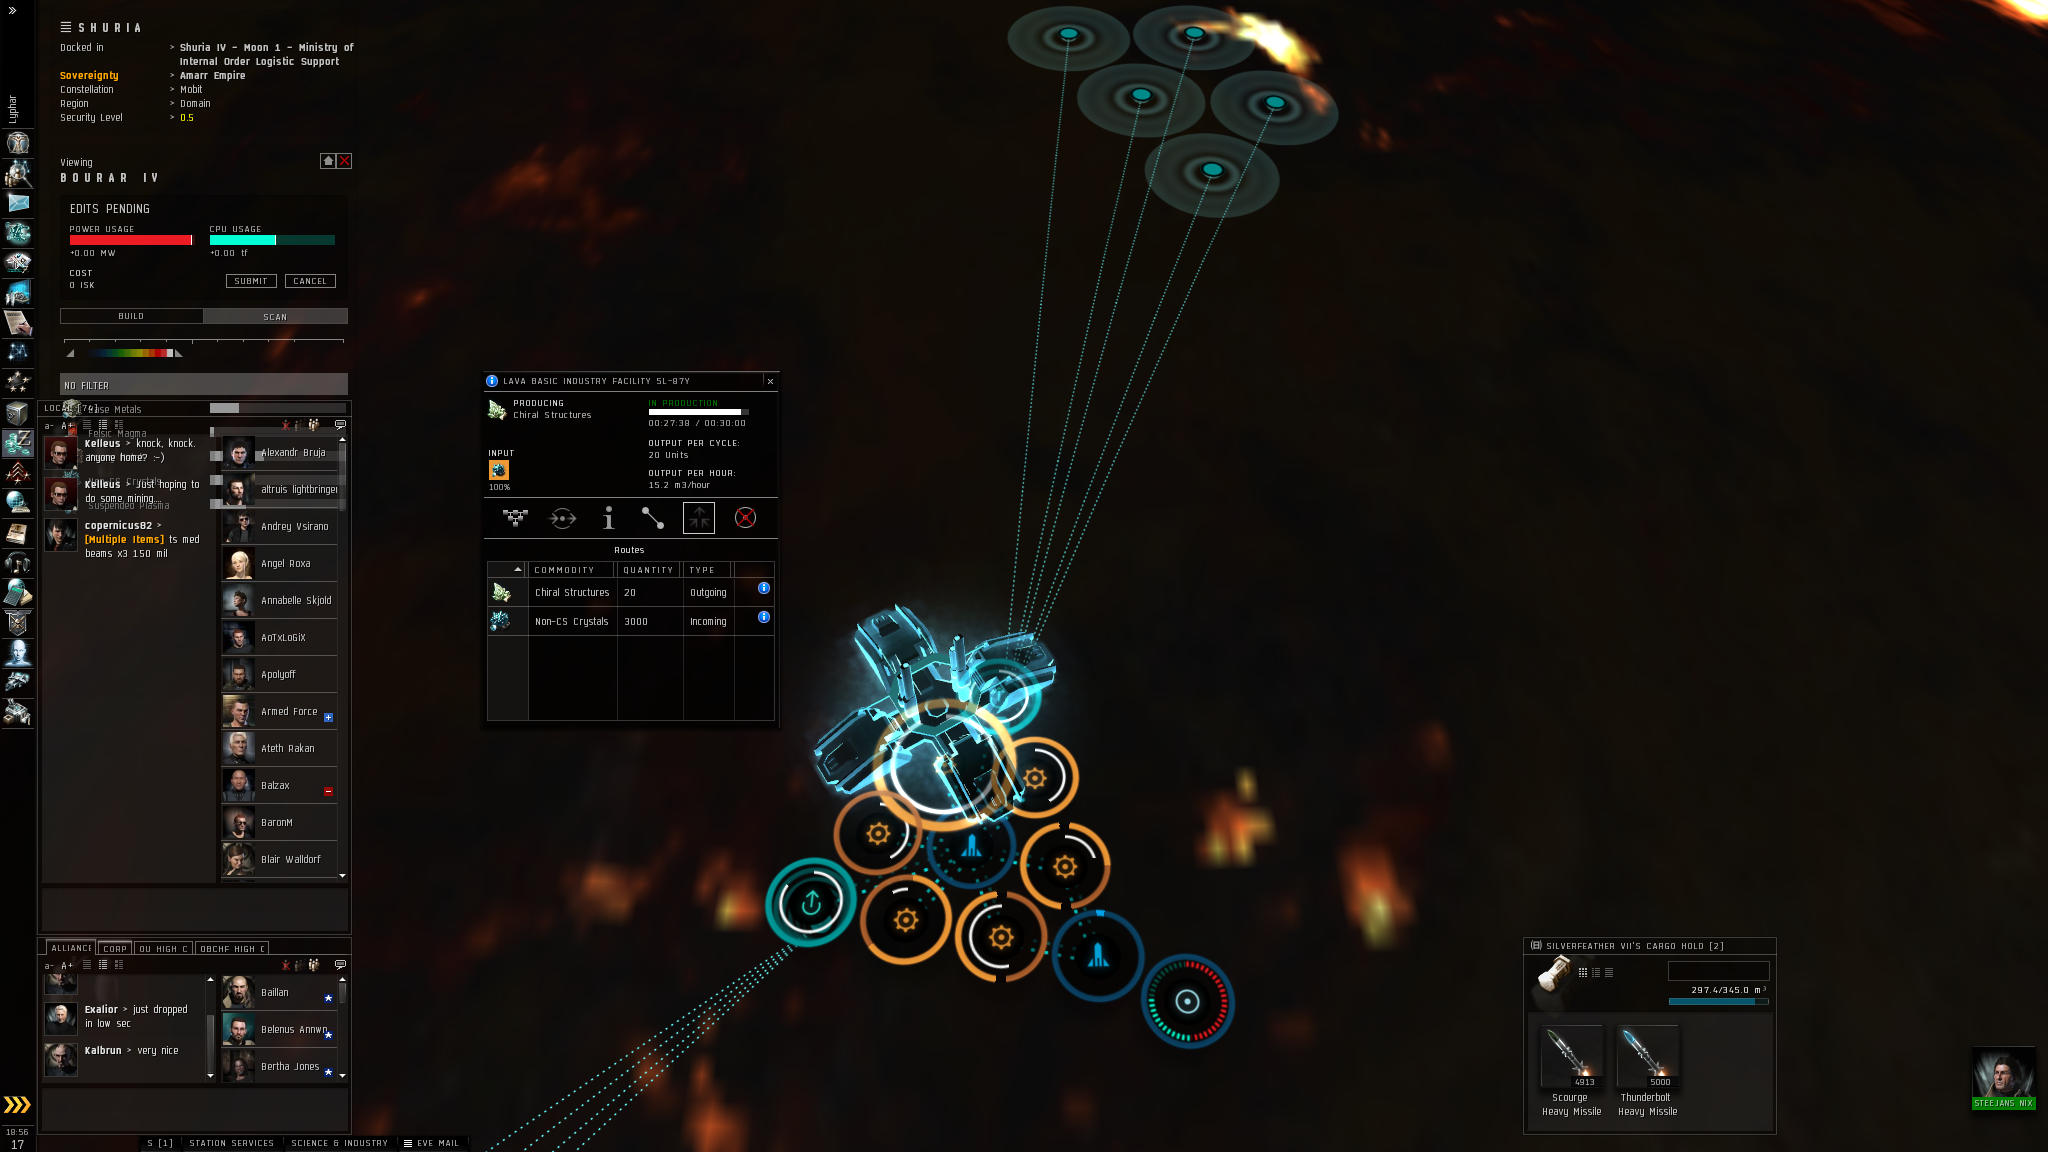
using my consumer electronics / robotics colonies on lava and barren planets respectively as an example.
Consumer Electronics require Non-CS Crystals / Chiral Structurs and Heavy metals / Toxic metals (raw form /
refined form).
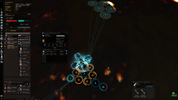
When you are in planetary mode, you will hit the scan button and select the mineral or material you wish to
scan for. If the material is pretty sparce you won't be able to easily see where the materials are. On the
set of colored bars there are triangles on either end. Drag the right one till you can see the materials easier.
Now look for the second material you will need in production. In this case it is nobel metals.
Place your Colony Command center somewhere towards the center of the two selected mining points and submit changes.
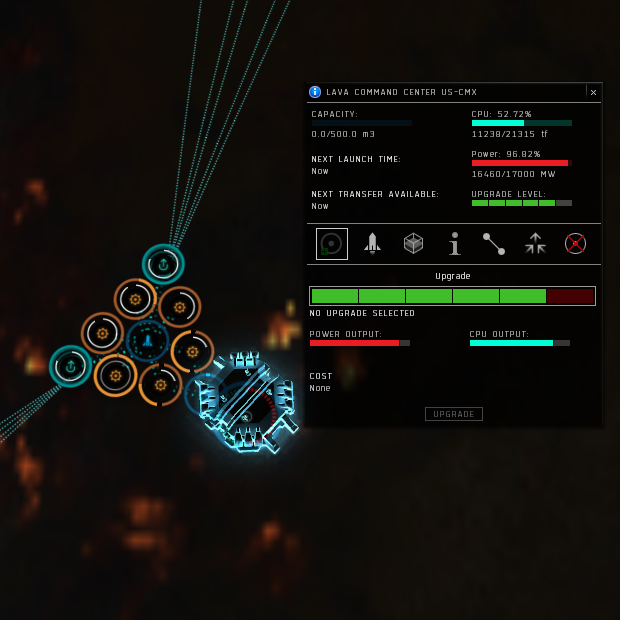
After the command center is down, you can build the entire colony WITHOUT hitting the submit button (upgrade your
command center first, then hit submit, then build). This allows you to setup and play with the layout before submiting
the changes. Remember each change costs isk.
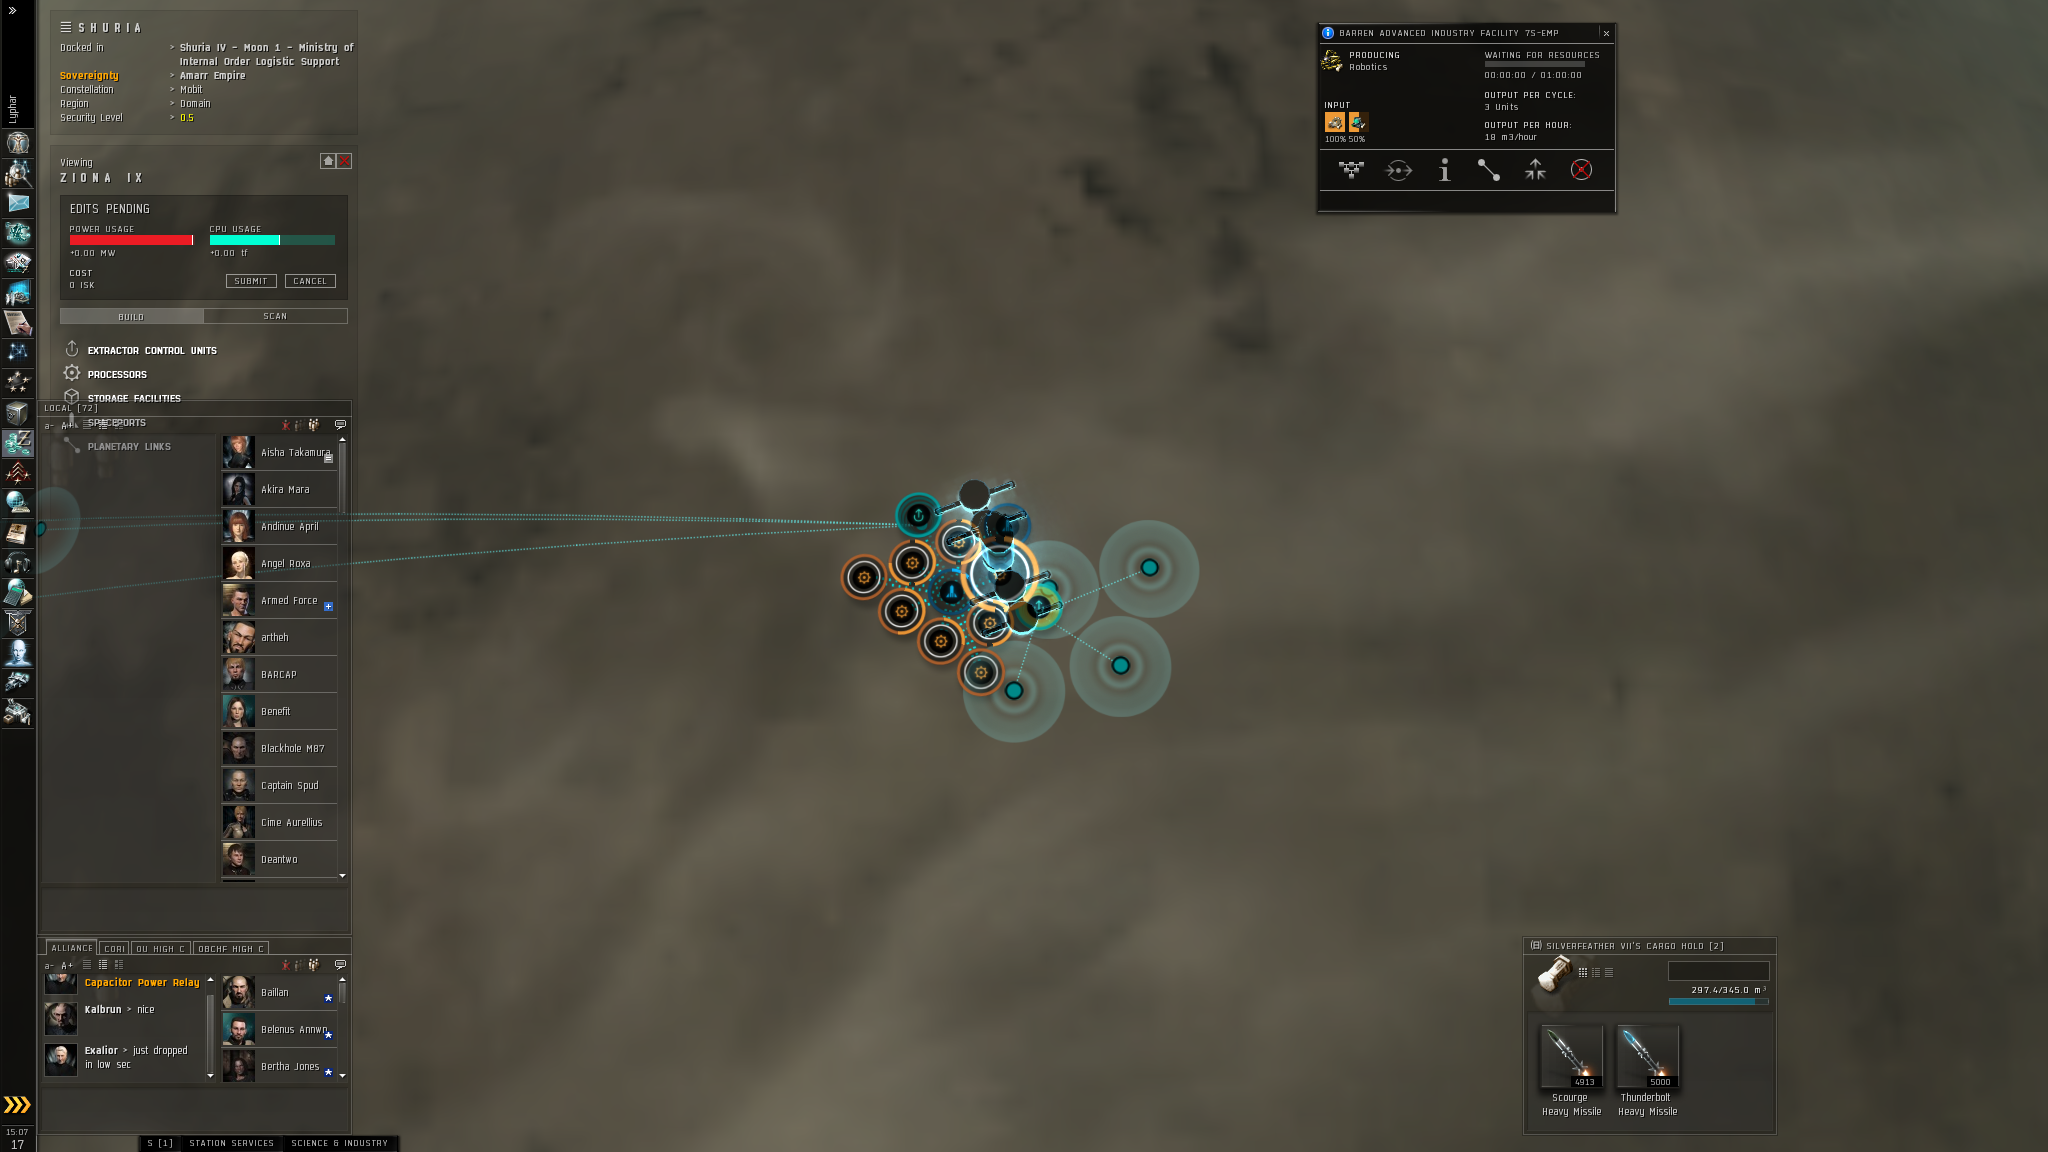
The new layout which I've been using is an expanding triangle/star patern, which packs the extractors, refineries,
and storage as close together as possible. In order to do this I start by placing the end point launch pad.
Then placing two advanced industry facilities as close to each other and the final launchpad as possible. Then place
a launchpad between the two adv. industries, surround this launch pad with standard industry facilities, and finally
place the extractor control units on the corners of the triangle.

Hit ctrl, click the end Launch pad, release ctrl and click the adv. industry (this creates a link). Repeat this connecting
all the modules to the center launch pad (except the end launch pad) and the two adv. industry facilities to the end launch pad.
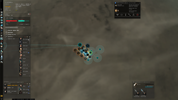
Then survey at your extractor control unit. Select the material you want to harvest (upper right) and the survey
data on the planet comes up. On the left side of the surveying program is 12 blank circles. Click one and it places
a new extractor head. Move this to the center of the richest region. You will see the number next to the extractor head rise.
This is how much the extractor head will produce for the first cycle (the graph will show you how the cycles will vary over time).
On the bottom left corner is a drag bar which allows you to select the extraction period. The shorter period of time will
extract a larger amount of mineral per time, but you have to keep up with the colony and restart the program after
each of those periods of time (No longer have to resurvey just restart program). I recommend the 6hr period if you actively
play during the day and 1-3 day extraction if you are off and on or busy during the day. I use a 24hr extraction and restart
the etraction programs each morning. Now place enough extractor heads as half of your remaining power grid (the other half
of remaining powergrid will be used on the second extractor head). Do not overlap the bubbles for the extractor heads or you
will loose a percentage of the extraction.
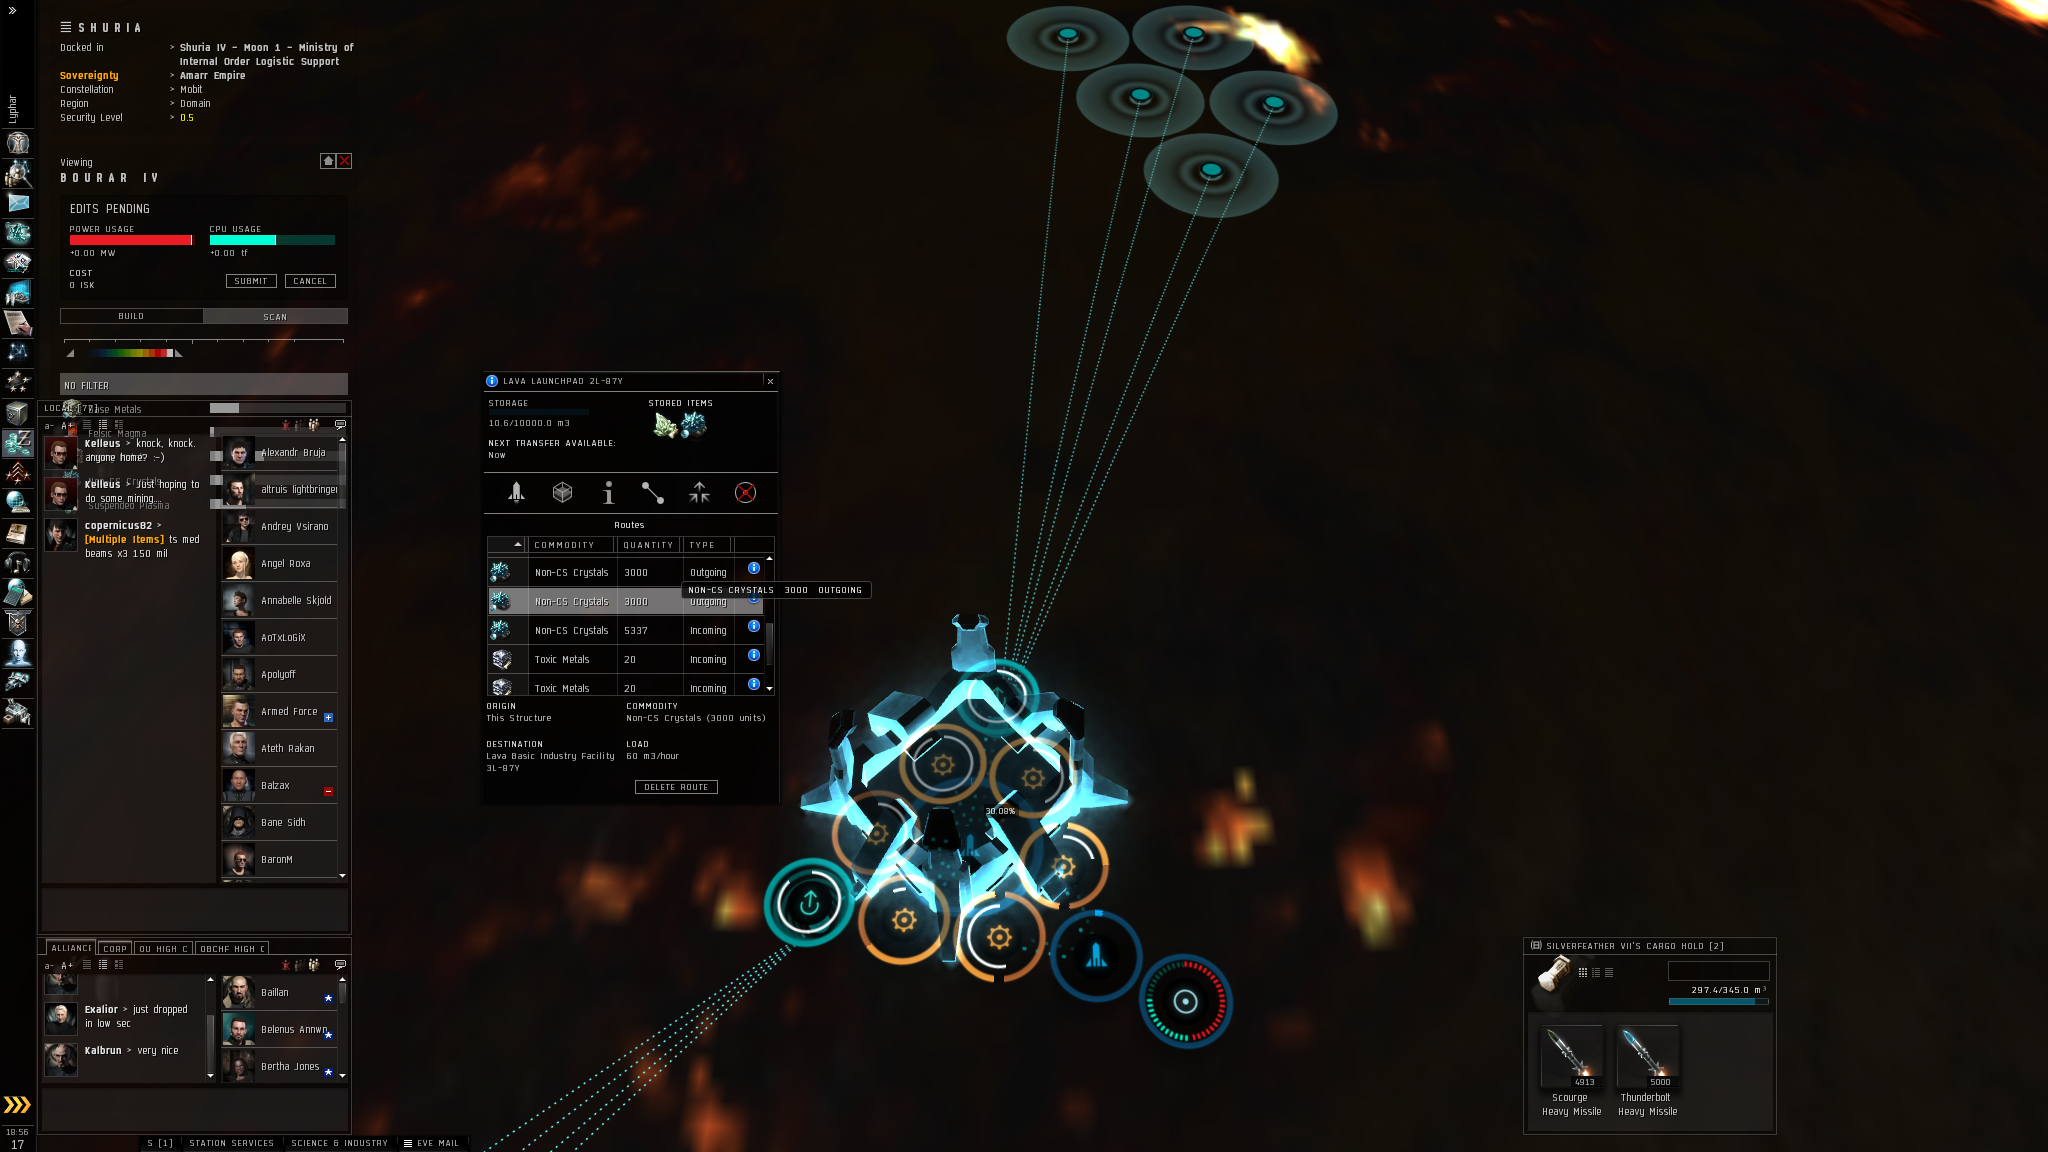
You must then route the extracted material to your storage (center launch pad).
Then route the incoming material from storage into the refinery.

The finished material is then routed back into the center launch pad.
The finished material is then routed from the center launch pad into the adv. ind. facilities

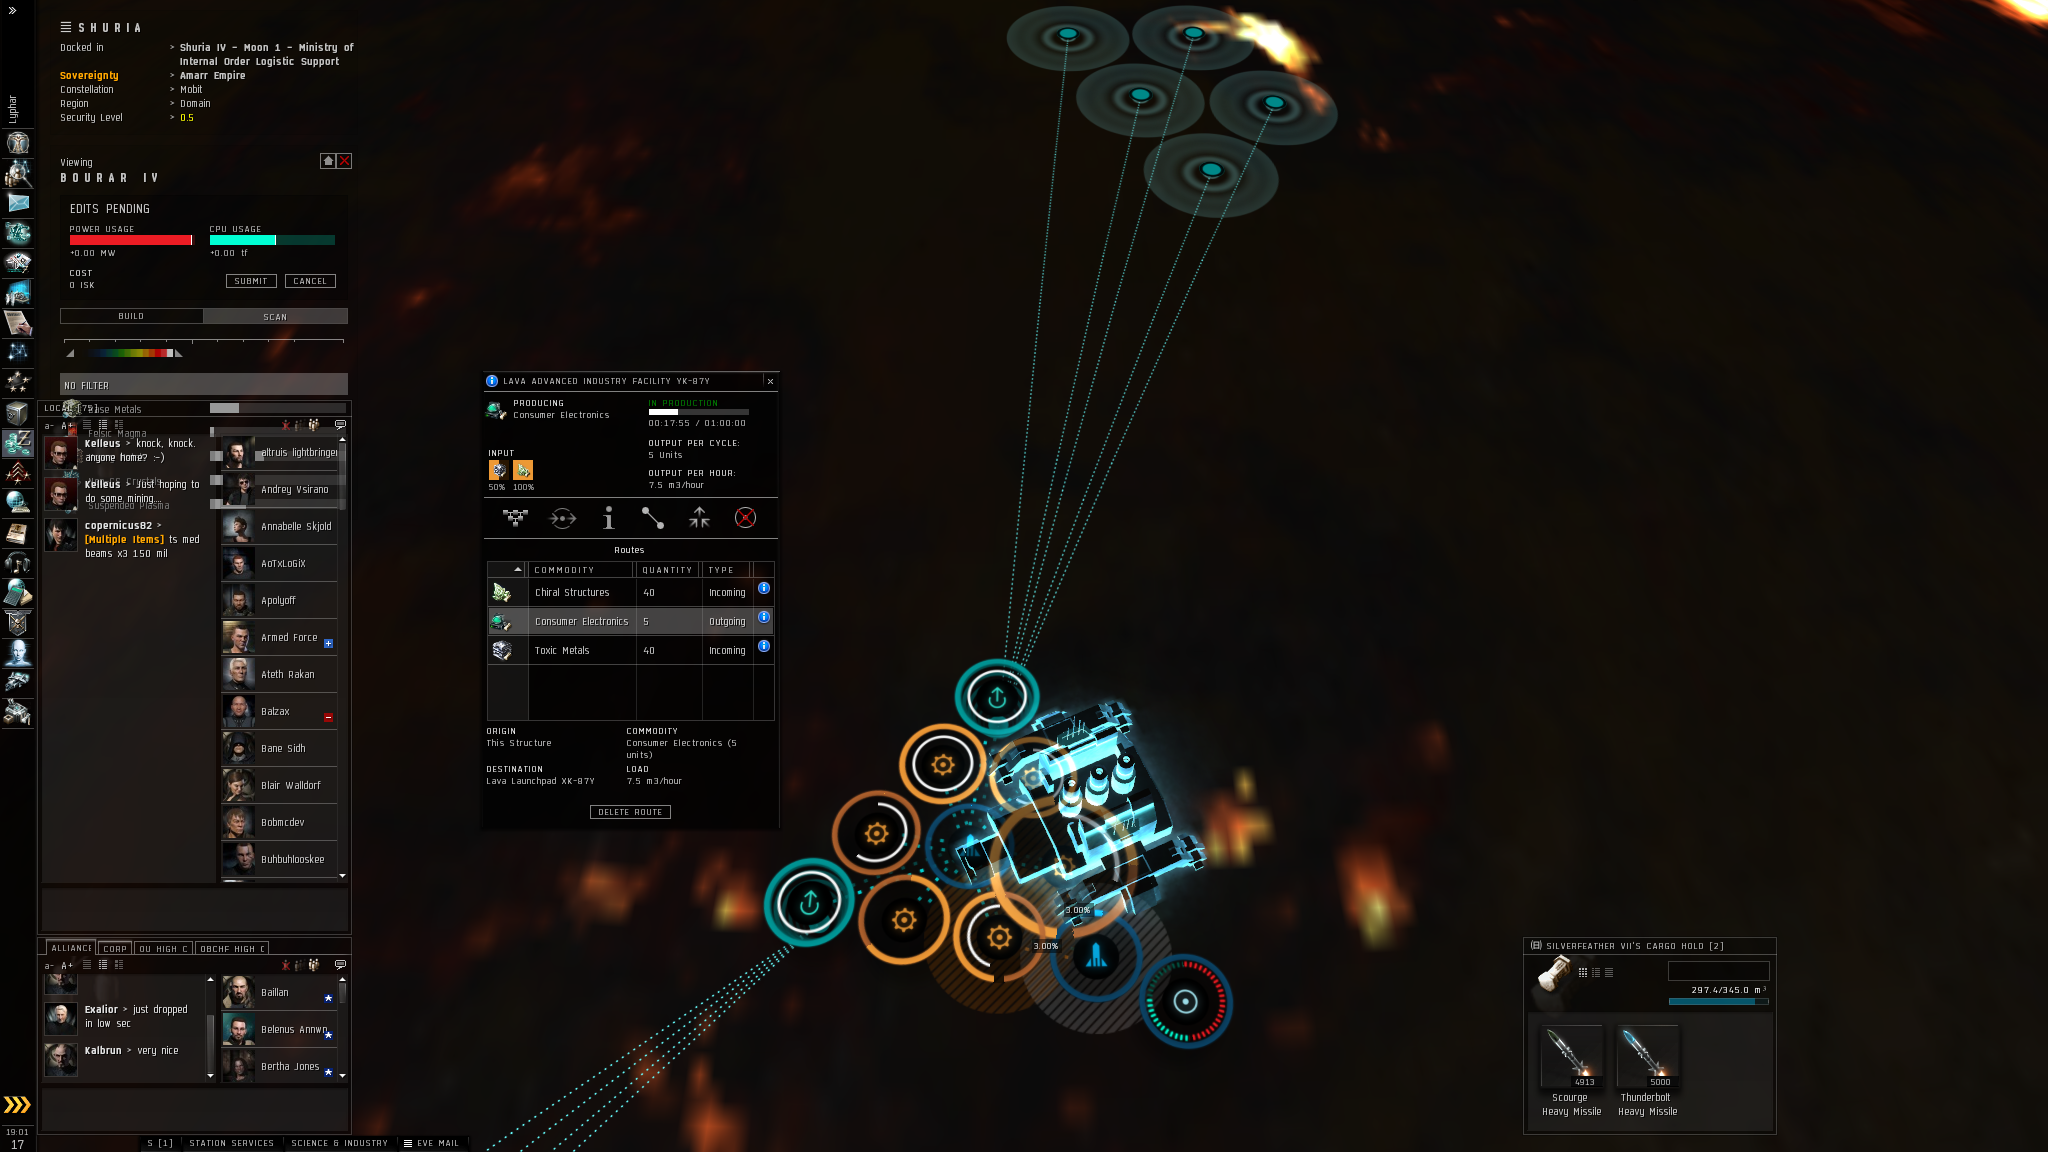
The two materials are then routed into the advanced industry facility to be manufactured into consumer electronics. The
consumer electronics are then routed into the final launch pad to await pickup
The robotics are then placed in the launch pad for storage.
After a colony is placed, the command center is unrecoverable. Also it is not necessary to run any links through the command center.
With the new extractor control unit setup for PI, you also no longer can build robotics (or any 3rd tier PI item
PI Wiki) on a single planet.
Keep in mind which of the minerals will extract faster than the others and plan accordingly (less extractor heads on faster extracted mats).
Now as I stated my layout for colonies is a triangle/star expanding patern. This is seen only in adv. colonies (colonies used for
producing T3 or higher items).

Now this is my colony that produces mechanical parts locally and produces robotics by importing the consumer electronics. As you can see,
the bottom basic industrial facilities produce the metals for the mechanical parts, the next layer of advanced indust. facilites produces the
mechanical parts, and the top layer of adv. indust. facilities produces the robotics. In order to save the most space the extractor control
units are placed on the sides of the triangle closest to the center storage launch pad. The larger colonies get, the more they expand from
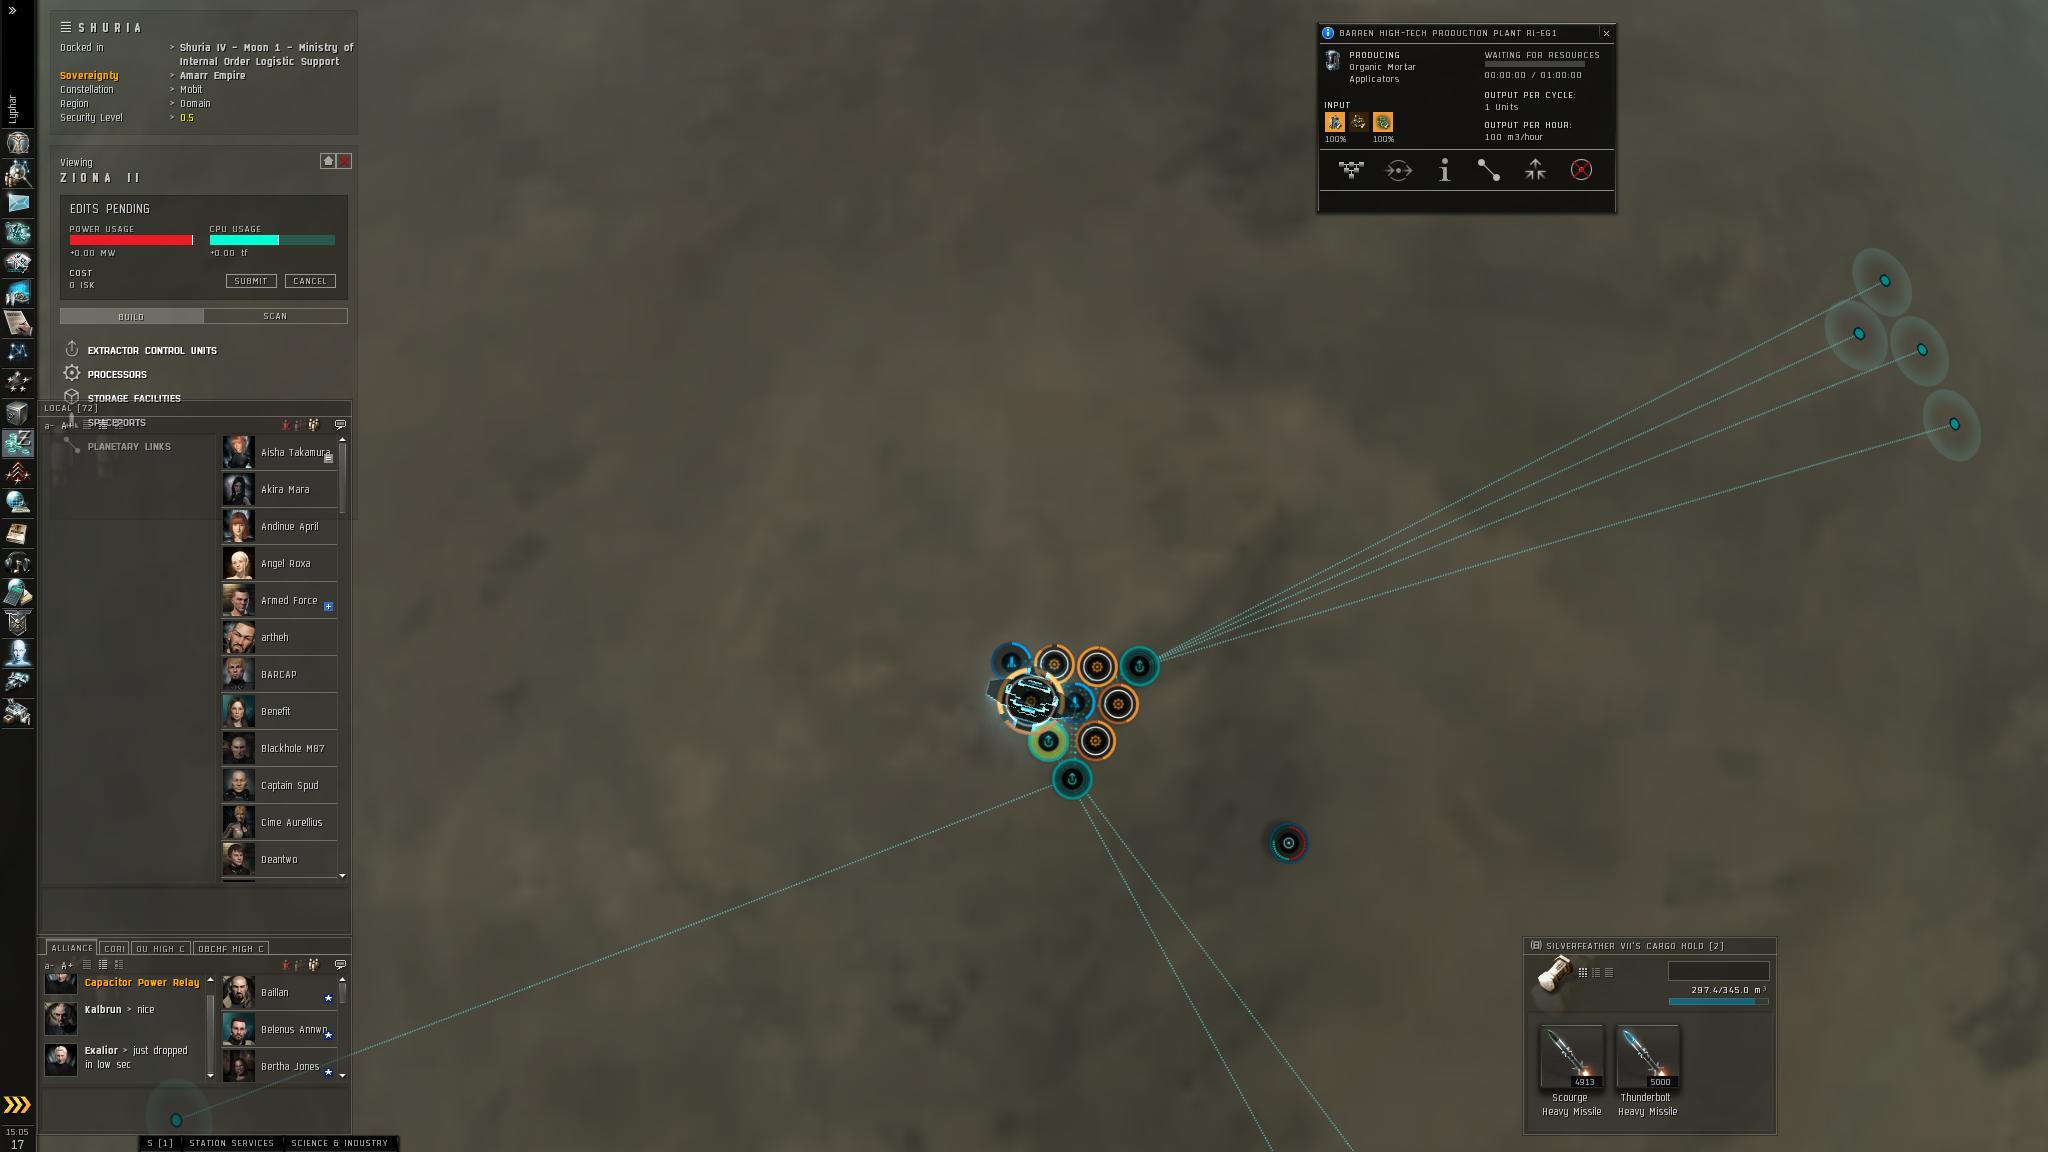
that center launch pad. Another example is my Organic Mortar Applicators colony. Now I'm producing the Condensates and Robotics off planet
so I only have to extract bacteria locally to produce the Organic Mortar Applicators. As the High Tech Production Plants and the one extractor
does not take my entire powergrid, I'm using the extra space to produce mechanical parts.

T3/T4 items can bring the most isk depending on what you make but be careful that you don't waste too many colonies on producing high end items.
Sometimes simpler T2 items produce faster and bring greater revenue per colony. For Organic Mortar Applicators it takes 5 colonies to produce efficently.
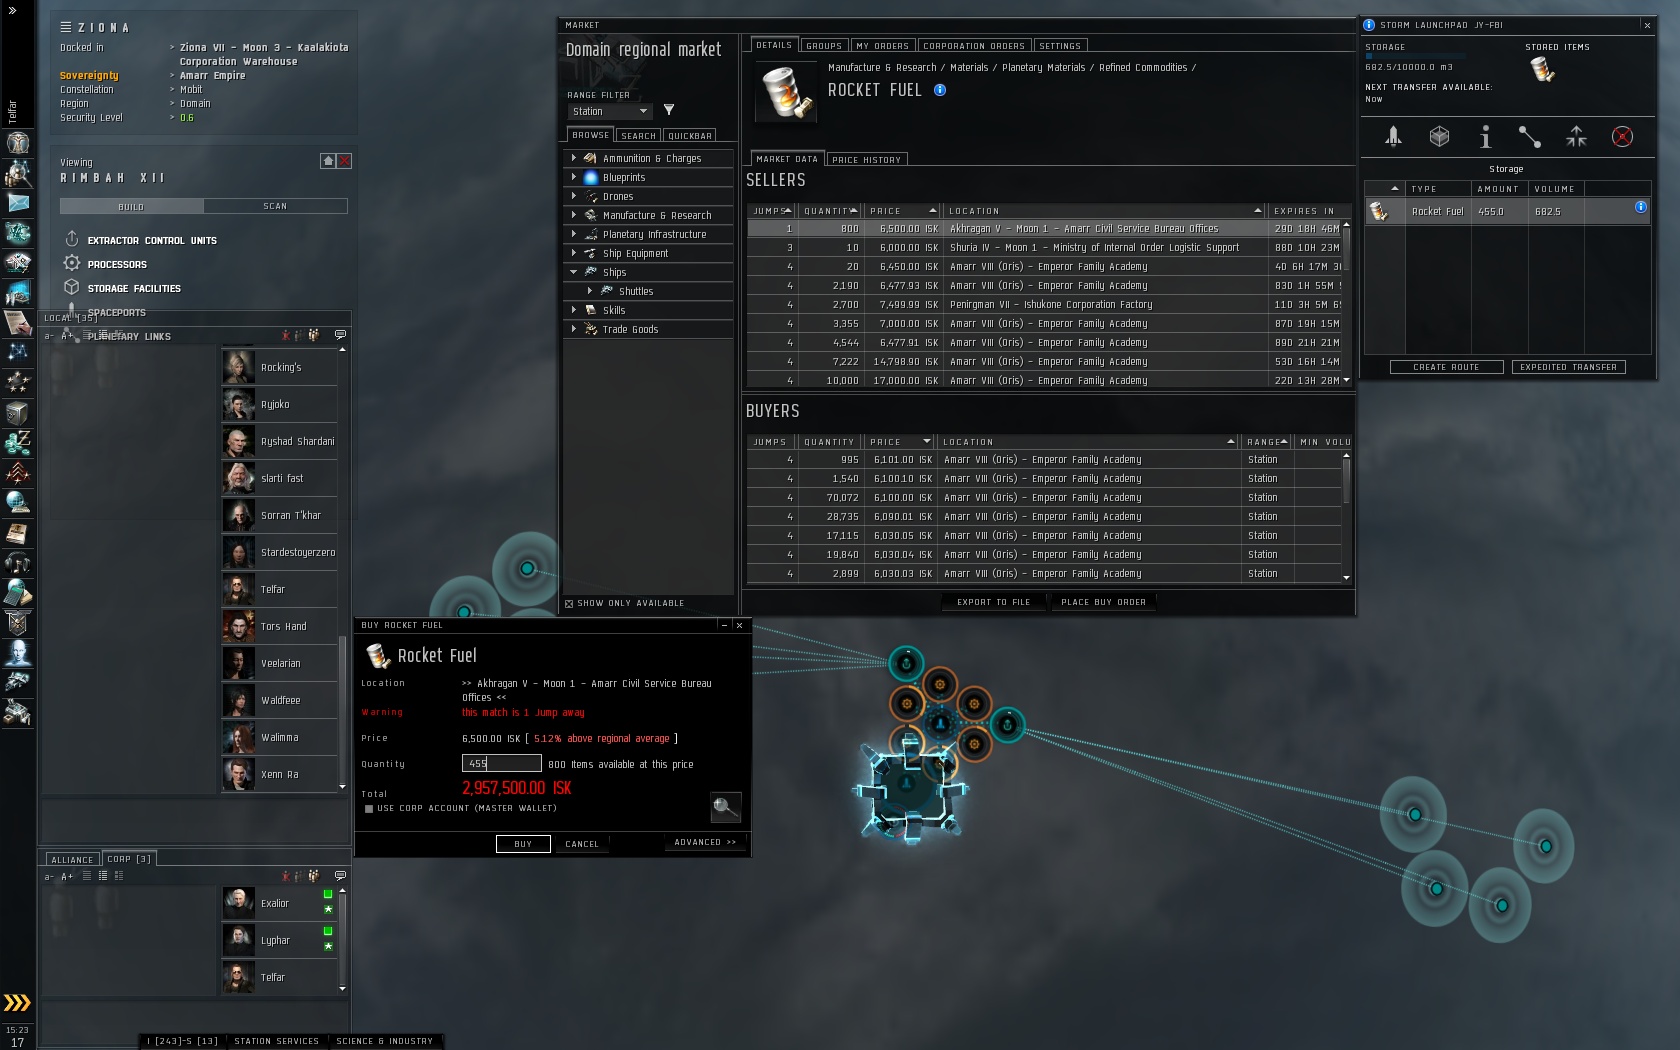
I also produce Rocket Fuel for profit by storm planets which easily makes me 30mil a week and about 100mil a month. The below image was after
having placed the colony yesterday and I run 2x other colonies identically.

Please also note that PI produces more the lower security sec. the planets are. Most of my PI is in the Milal low sec. ring, so its close to home
and produces decent amounts. While lower sec. planets produce more, it also is much more risk extracting your materials from planets and getting
them to market. Once again fly with warp stabs on indust. ships and fly with escorts and/or scouts. I hope this update brings you all up to speed.


Probing Tutorial
June 17, 2010, Lyphar
Probing is a tedious and LONG process which is necessary to find any WHs (entrances and exits), Areas in WH Space, or People.
Combat Probes are needed in order to probe down players and is more difficult esp. if the people are moving about. Normally
probing requires the skills to be able to use 5+ probes at a time. All Skills Labeled Astrometric help with probing.
This tutorial will be for WH space, but the principles are the same.
When you go through a WH drop your probes, Bookmark the WH you are at, and then warp to the nearest planet at 100km and cloak.
Open your scanner window (button by your Shield ring at center screen) and hit F10 (map) (make sure that its in sys. view rather
than star map and then minimize the map control window). Then immediately probe down the WH you just came through (2 AUs cross formation). You should
run the 5 probes in a cross formation with each probe tip-to-tip with the arrows. You can move the whole group of drones by
holding down the shift key and moving the drones. Each of the bubbles should have about 25-40% overlap between them.
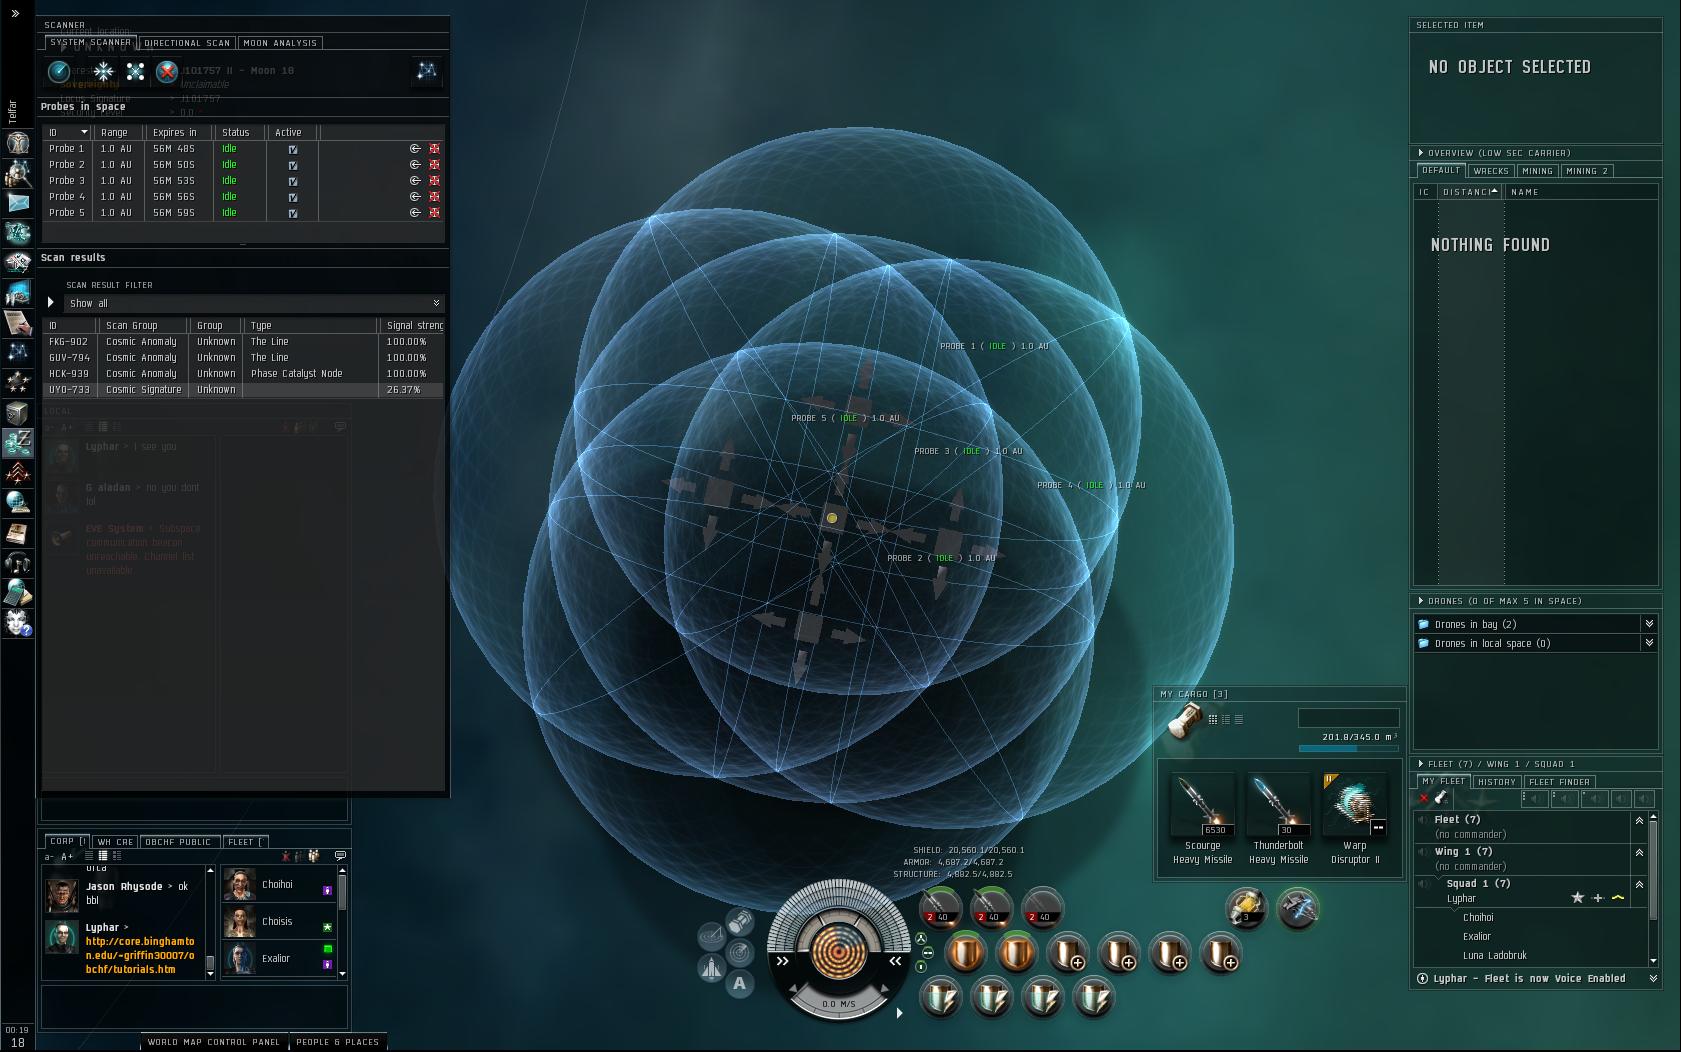
When probing down the WH you just came through you should only see the general WH areas (Marked unknown with immediate 100% lock)
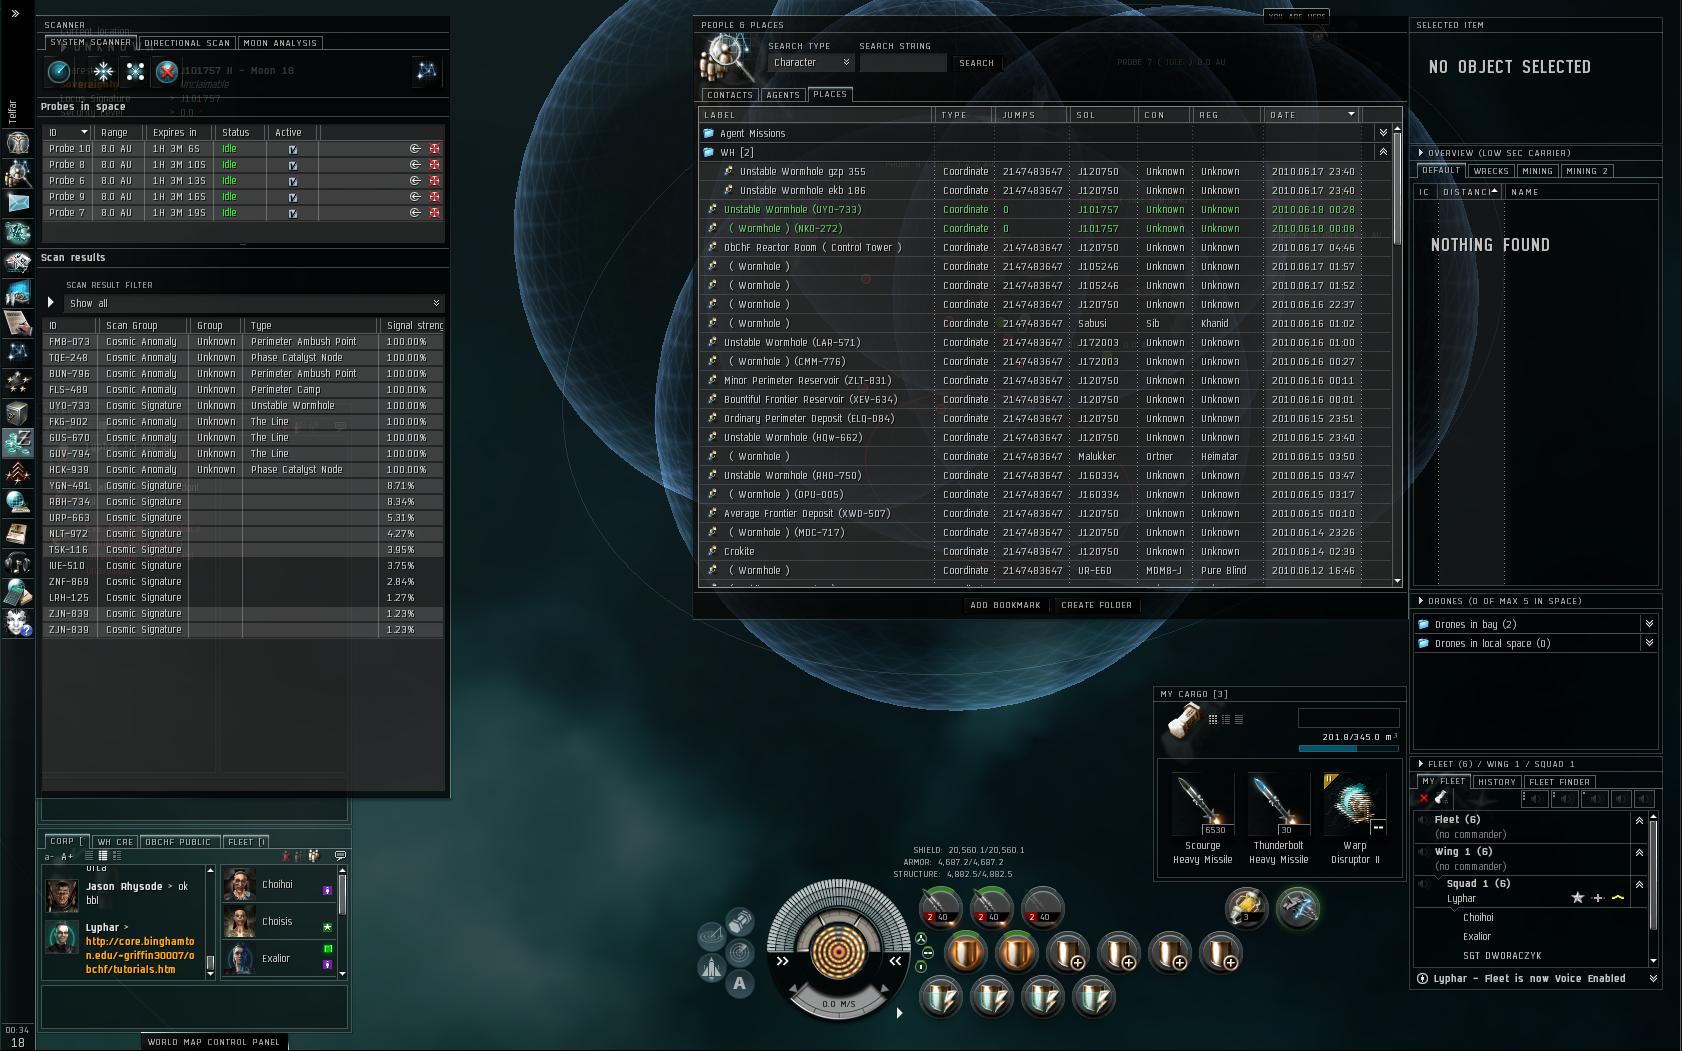
and then the WH you just came through will be an unlocked single unknown point. Open your People and Places Window, Places tab,
and edit your recent WH bookmark to have the ID tag of the WH (so you know which one you don't need to scan down). Then move
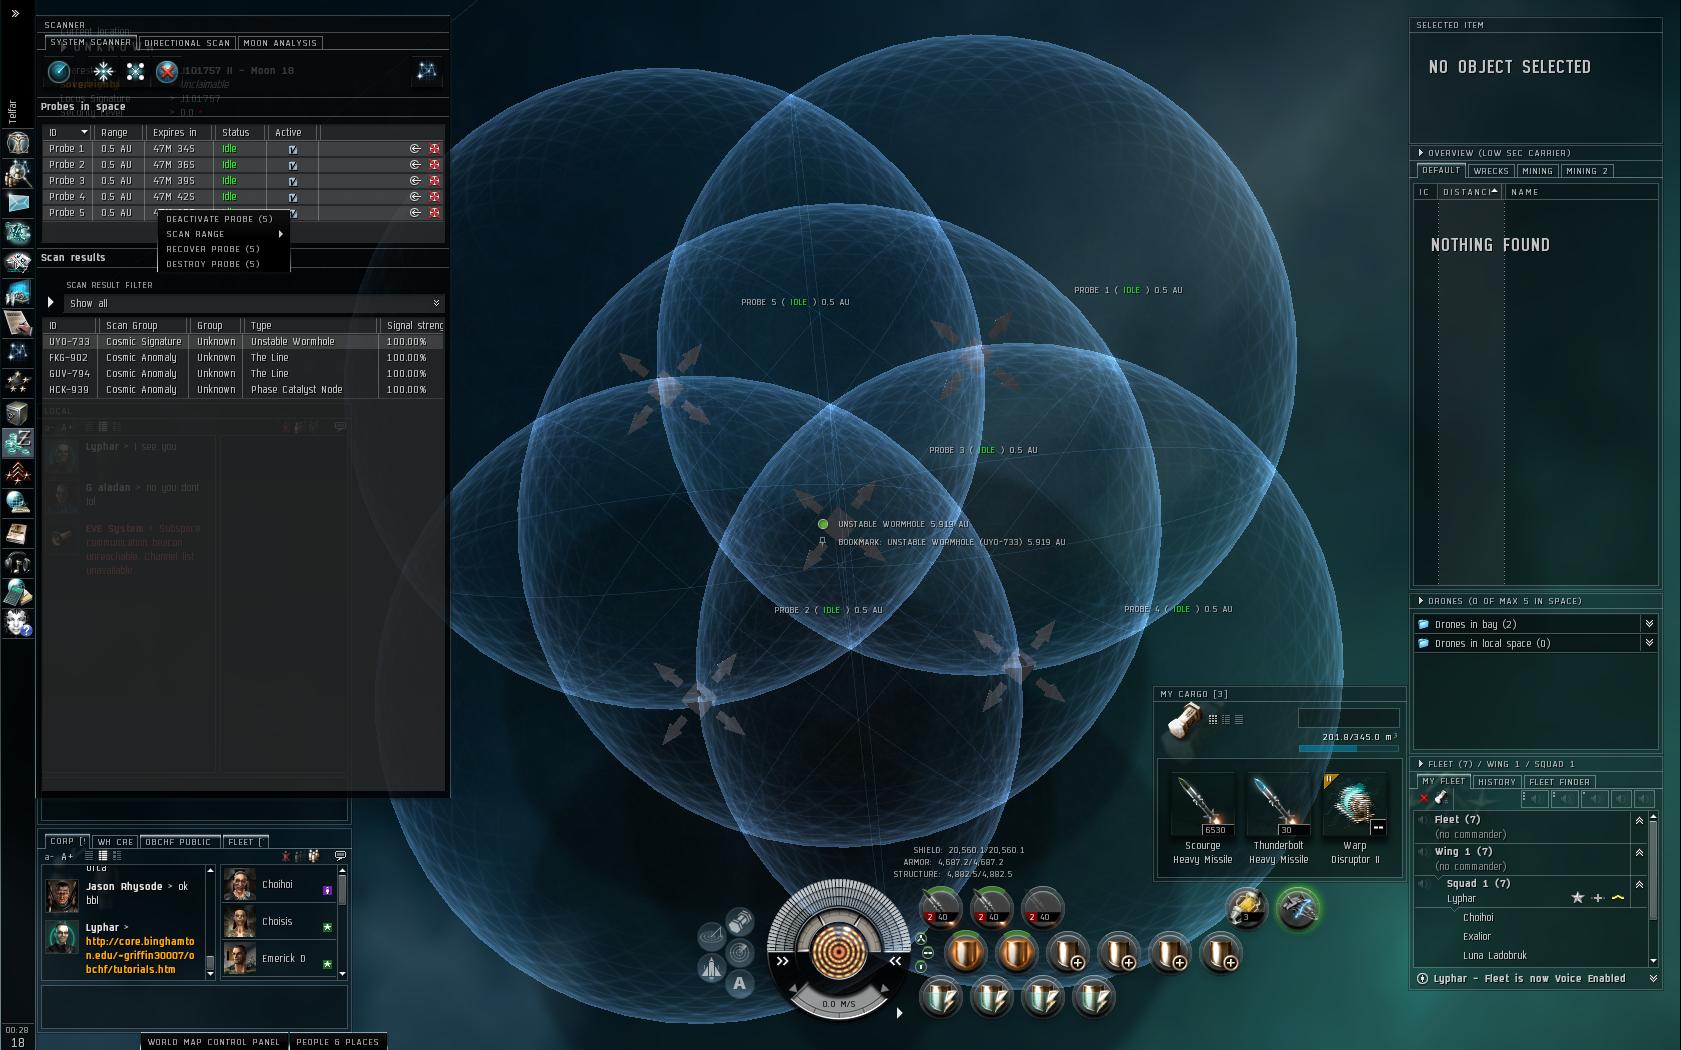
the drones out to 32 AU in the same cross formation and amount of overlap (hint: tip to tip arrows should have the bubble overlap
the arrows on the center) and slowly resize and move the group of probes down to a scan point. Focus only on one scan point at a
time. When you pinpoint the point, bookmark it with the scan ID in parentheses after the name, so that you don't scan down the
same point. When you lock it down, the point will become green (100%) and you can then warp to it.
After each downtime, the scan IDs change but the points do not. You can quickly get the new ID for the point, by
dropping the cross of probes right on top of the BMed point and so long as its the only BM within the bubble you should only get
that ID on your scanner. Relabel your BM with the new ID. Bookmarks that are in your sys will be highlighted green.
Exploration Site Types
* Unknown:
o Wormholes. These lead to other systems, either in "Known Space", (aka K-space, aka New Eden) or "Wormhole Space", (aka W-space).
o Exploration Complexes. These often have a Commander spawn, and can escalate, eventually culminating in an NPC which drops deadspace items.
o DED Complexes. Rated on a scale of 1-10 (you'll receive a message when you warp to the gate with their rating), these complexes do not escalate, but the final overseer has an excellent chance of dropping deadspace items, along with a small chance of dropping a faction ship BPC.
* Cosmic Anomaly: Combat sites with NPC spawns, with the possibility of escalating to more difficult sites or a commander spawn.
* Gravimetric: Hidden asteroid belts. Mining sites containing ores of rarer types and/or larger asteroids than the belts native to that system.
* Magnetometric: Archaeology/Salvage profession sites.
* Radar: Hacking profession sites.
* Ladar: Gas Cloud sites for mining gas.
http://wiki.eveonline.com/en/wiki/Exploring
If you're having trouble with locking a point (you're getting a ring
or bubbles) your probes may be too close together or the point might be in the vertical direction.

If you're still having trouble locking a point, and you can control 6+ probes, drop the 6th to the center of the probe group to finish off or "kill" the probe area.
PLEASE NOTE: Probes only last for a little over an hour. Remember to keep an eye on the timer and recall your probes before the timer runs out, esp. if you're running sisters probes.
o Exploration Complexes. These often have a Commander spawn, and can escalate, eventually culminating in an NPC which drops deadspace items.
o DED Complexes. Rated on a scale of 1-10 (you'll receive a message when you warp to the gate with their rating), these complexes do not escalate, but the final overseer has an excellent chance of dropping deadspace items, along with a small chance of dropping a faction ship BPC.
Crash Course Pt. 4 (Fleet Tactics Edition)
June 17, 2010, Lyphar
Here are some of the basic tactics for fleet combat.
Cloak and Bait:
Very easy to setup.
In high sec the bait is normally can miners out in a belt doing their thing. When a can flipper comes along and decides to
flip the can, the combat ships decloak and kill the can tipper. Only issue is it takes a few secs to be able to decloak and lock and fire.
So the bait normally should be equipped with a warp scram. See if you can spot the drake in the following pictures.
Cloak and Dagger:
For Low Sec or Corp Wars. Normally on most of the combat ships there are extra high slots which should have a cloak and a
spider tank module or a probe launcher. Cloaks are great for hiding your numbers and types of ships. Cloak outside of a
WH or Gate and watch who goes through.
Cloak and Nuke:
This is a more devious tactic. You have to have a LOT of coverts ops Stealth Bombers. The bombers can warp while cloaked,
so they can approach their target unnoticed. The Stealth bomber equips 3x Torpedo Launchers and a Bomb Launcher. Bombs can
only be used in 0.0. Remember that if you're within 2km of anything you get knocked off your cloak. The bombers approach
the target from all sides and on the order of the fleet leader, all decloak at once and fire everything. This works on
taking down any size of ship, you just have to have more bombers. The bomber is a glass ship (next to no tank) so a few
might be lost but if you sync it right, no one should loose their bomber.
Fleet vs Fleet (All Out Combat):
First and formost when fighting in fleet you MUST listen to your commanders. If they yell "check" or "high alert" everyone
is to shut up and wait for orders. No one is to be chatting during combat. If you become primaried, you can use your
broadcasts to let the command know. Fleets will be balanced and divided into squads based on the type of tank. This is so
that you get the proper bonuses for your ship and get the proper repairs.
Crash Course Pt. 3 (Fleet PVP Edition)
May 23, 2010, Lyphar
THE GREAT COMMANDMENTS OF PVP:
1. Thou shalt not fly a ship thou can not loose.
No mater how well you have the ship fitted and how many people you have with you there is always the chance
that you will loose your ship.
2. Thou shalt not talk in local.
This is key so as the enemy is not provoked, does not know your numbers, skill lvl, ect. Talking in local
without permision is downright stupid and it proves you're a novice at PVP to the enemy.
3. Thou shalt always be aligned.
ALWAYS. Don't care where you are. You always are aligned to something (stations are best) so as you can
escape in an instant. If you aren't aligned it can take your ship 15-45 sec to align, plenty of time for a tackler to point you.
4. Thou shalt always watch local.
If you can see the enemy show up in large numbers in local, you think you'd want to GTFO right?
5. Thou shalt never fly alone.
Two heads are better than one, so I can smack them together when you guys get back with only your pods.
6. Thou shalt obey thy commander.
If a commander gives an order there's normally a good reason for it, and they always have better experience than you.
Knowing is Half the Battle:
I am making this post today because we have some hot shot pilots who think that they can take on the world.
First I would like to aplaud you for your bravery, yet that bravery will not help you survive within a PvP battle. Forget
EVERYTHING you think you know about PVP from other MMOs, EVE PVP is all one large numbers game.
First and Foremost, it comes down to the age of the characters you are against and the number of characters on their side,
vs the number of chars on your side vs the age of the chars on your side. If you have a group of 2010 chars vs of 2010 chars
at even numbers of players, then it comes down to what skills each side specialize in. For example, if your side is split
between various indust and PVE skills vs their side is in a PVP corp (assuming that they all trained PVP) then you have already
lost before the first shot has been fired. Don't know how many corp members the enemy has in sys? Then set their corp to negative
standings or ask one of the officers of ObChF to set corp wide standings. Right click the player, show info, click the corp icon
of the player, go to standings, relationship, right click ("your char" > "their corp") and set standings to -10. If you want a
member of the High Command to set corp wide standings, message the name of the players in question (linked!), and give a reason to
set corp wide settings. You can link the char. by dragging their icon from local player list into corp chat, or by typing thier
name, highlighting, right-click, auto-link, char.
This screen shot was taken in low sec ages ago, please note how I have my local chat pulled out seperately and about twice the
size of corp chat. That is so that I can quickly and easily see friendly or enemy players within local sys. If you have a problem
with the windows moving around, pin them (icon that looks like a target), then open the main menu (esc), general settings tab, and
lock windows when pinned.
NEVER FLY SOMETHING YOU CAN'T AFFORD TO LOOSE:
Gods, I can't beat this into your fracking heads enough. I don't care how careful you're flying, how many you're flying with, just
blowing through high sec, low sec, 0.0, WH space, you ONLY fly what you can afford to loose. This includes pods, modules, rigs,
ships, ect. If you are worried about loosing your pod, create a jump clone, and fit it with an exact copy of your current implants.
But, it is extremely hard to lock down a pod before it can warp out. This is why its always best to save former ships you may have
upgraded from in your PvE endevors. Even if your ship is
FULLY insured you can still loose isk on modules, rigs, and the cost of insuring the ship. Also T2, T3, and Faction ships can not,
I repeat CAN NOT be insured. Even so, that does not put these ships out of the running for PVP, just only out of the running if
you can't afford to replace it. This is one of the major reasons why T1 Ships are mostly used in PVP. You NEVER fly something
into low sec (WH space counts as low sec) that you aren't ready to loose to PVP. You know that shiny new BS that you just built
and put 100+mil over what the insurance will pay out into modules. Not recommended to fly unless you can loose that 100mil or can
replace the 100mil. This is why most of you guys haven't seen my 1+bil carrier in action.
The Better Tank Will Always Win:
Ok quell the crys of outrage right now. This is a generalization which for about 95% of the cases of PVP is true. When you are
involved in a Fleet PVP battle almost always the weakest and most vunerable targets will be targeted. Similarly when fighting
Sleeper drones in WH space, Sleepers will target the weakest link of the fleet or newcomers to the fight (Please note if you get
jumped by PC Pirates while in a sleeper area, DON'T panic, the sleepers will target the pirates and you can turn you attention
to the pirates.). So if you have a very weak tank, you will be poped first. Now there are exceptions to this rule. Caldari BCs
are a much better tank than their BSs, even though the BSs can dish out more dmg, the dps can't overcome the BC tank (see Ultimate
Drake Setup). For Armor tankers (Amarr and Gallente), their BSs are much better tanks, so long as they are fitted right. This is
where most people prefer Amarr or Gallente for PVP because their BSs are their ideal tanks and dmg dealers. Since this is the
common train of thought, by flying Caldri to PVP, most amature PVPers won't be able to react as well. Experienced PVPers will be
able to adjust their strategy accordingly.
Now BS ships are very slow ships and have a hard time locking down anything BC and smaller. Armor tanks make the ship even slower.
Drones:
They may be very awsome minions to have, but in PvE and PvP you should not be using anything other than light drones for any ship
that is not drone specialized (see the Dominix). You want light drones, esp. on BCs on up because they can take out frigs. that
are warp scrambling you. On BSs you should have 1x Wing of Light drones and 1x Wing of Hornet EC-300s (A Wing is 5x drones). The
Hornet EC-300 are ECM drones that will knock out the targeting sys of whoever you use them on. Drop them in an emergancy situation,
knock out the warp scram, and warp out, LEAVING THE EC-300s BEHIND! 5x EC-300s cost about 100,000isk and a new BS cost 80+Mil isk.
As for the regular light drones, almost any T2 light drone will work, but I prefer Warrior IIs since they are the fastest light drone
so they can keep up with speed tanks, and they do Explosive dmg which is key against all armor tanks.
Fitting Your Ship
Ok so you've read all the above info., have a T1 ship you're prepared to loose, and you're ready to try your hand at PvP. Well we need
to fit the ship properly first.
General Combat Ships:
Frigates:
Frigates have very specific roles in PVP, and it comes down to two classes: Tacklers and Interceptors (not the T2 ship).
Tacklers are setup with a Warp Scrambler, Webifier, Afterburner, and Inertia Stabilizers. Weapons are not a priority since their
job is to keep a target in place so as the rest of the fleet can eliminate them. The Afterburner should keep the ship moving
fast enough to avoid getting hit and the inertial stabilizers allow the ship to turn and orbit faster. Tacklers should orbit at
about 5km.
Interceptors are designed to take out tacklers and small ships, but are used rarely in fleet ops. Normally the interceptor fits
as good weapons as they can get on their ship, then the best tank that they can fit. Afterburners are key to this class so they
can keep up with the prey. Normally close range weaps are best for this ship.
Destroyers:
Destroyers are setup just as the name and description sounds, to destroy lots of frigate class ships. Normally they will fit as
many turrets as possible, a basic tank, and an afterburner. They will orbit the fleet at about 10km and eliminate and tacklers.
Cruisers:
There are two major classes of cruisers, Primary Damage Dealers, and Frigate Eliminators. I will be using the Caracal as the
example ship for this class of ship. The one difference between the two classes is the type of weapon module in the high slot.
For Damage Dealers, they will fit Heavy or Heavy Assault Missile launchers, whereas Frigate Eliminators will fit Assault Launchers.
The Frig. Eliminators Assualt launchers fire standard missiles at a very rapid rate and can take out large squadrons of frigs in
a matter of seconds. Like Destroyers, Cruisers will have an afterburner and orbit the fleet so as to minimize the dmg they take.
BattleCruiser:
These ships are the heart of the fleet and are normally setup to tank as much as possible, rather than focusing on dmg. Their
extra high slots should be used for a T2 Improved Cloak and some form of remote repair (shield transporter, remote armor rep).
If you aren't getting hit, you can remote repair someone who is, and the cloak is great for ambushes (I will discuss this tactic
farther down).
BattleShips:
These ships are the primary damage dealers of the fleet. They are extremely slow and should be setup with the best tank possible,
light and EC-300 wings to take out warp scrams. On any BS other than sniper ships, they should fit a Improved Cloak II and Remote
Repair Module to their extra high slots.
Specialized Combat Ships:
Most of these ships play very specific roles in the fleet and most of the time can not act alone.
Assualt Ships:
Designed to have an excellent set of resists and be able to out fly most damage. These ships are designed for solo ops or fleet
ops for taking out smaller ships. Should fit a Warp Scram and Afterburners.
Heavy Assault Ships (HAC):
Heavy Assualt Ships or HACs (Heavy Assualt Cruisers) are setup with an excellent set of resists and are designed to out run any
other damage. Can run solo or in fleet. Should fit a warp scram and afterburners. Excellent for taking out frigs and small
ships if fitted with assualt launchers. Overrated for taking out larger ships.
Command Ships:
Heavy Assualt Battle Cruisers with the focus on Command. Great resists but the missing mid and low slots over say the Drake makes
it worse of a tank. If you're running more than one command module, the command ship is definately worth it.
Interdictors and Heavy Interdictors:
Interdictors can drop warp bubbles in low sec and are setup with similar resists to the Assault ships. The Heavy Interdictor is
the HAC version of the interdictor and can also drop a warp disruption field, which is a field around the Heavy Interdictor which
people can not warp away from. Very deadly ships and are normally the prelude to a larger fleet attack.
Interceptors:
Interceptors have two roles. Tackler and Interceptor. Tacklers orbit the target and lock them down (warp scram). Interceptors
(role) fit for combat to take out tacklers. Both roles should fit MicroWarp Drives, Warp Scram, Afterburners, and Inertial Stabilizers.
These ships can normally out run any enemy fire.
ECM Ships:
These ships focus around breaking the enemies target lock. This is done with ECM modules (Electronic Counter Measures). Most balanced
fleets have a couple of these ships. Examples of these ships are the Scorpion and the Blackbird.
Logistics Ships:
These ships are dedicated remote repair ships. They are HAC based and they can repair at great distances. They are usually unneeded
depending on the number of spider tanks in the fleet, but are very handy in a pinch.
Frigates have very specific roles in PVP, and it comes down to two classes: Tacklers and Interceptors (not the T2 ship).
Tacklers are setup with a Warp Scrambler, Webifier, Afterburner, and Inertia Stabilizers. Weapons are not a priority since their job is to keep a target in place so as the rest of the fleet can eliminate them. The Afterburner should keep the ship moving fast enough to avoid getting hit and the inertial stabilizers allow the ship to turn and orbit faster. Tacklers should orbit at about 5km.
Interceptors are designed to take out tacklers and small ships, but are used rarely in fleet ops. Normally the interceptor fits as good weapons as they can get on their ship, then the best tank that they can fit. Afterburners are key to this class so they can keep up with the prey. Normally close range weaps are best for this ship.
Destroyers:
Destroyers are setup just as the name and description sounds, to destroy lots of frigate class ships. Normally they will fit as many turrets as possible, a basic tank, and an afterburner. They will orbit the fleet at about 10km and eliminate and tacklers.
Cruisers:
There are two major classes of cruisers, Primary Damage Dealers, and Frigate Eliminators. I will be using the Caracal as the example ship for this class of ship. The one difference between the two classes is the type of weapon module in the high slot. For Damage Dealers, they will fit Heavy or Heavy Assault Missile launchers, whereas Frigate Eliminators will fit Assault Launchers. The Frig. Eliminators Assualt launchers fire standard missiles at a very rapid rate and can take out large squadrons of frigs in a matter of seconds. Like Destroyers, Cruisers will have an afterburner and orbit the fleet so as to minimize the dmg they take.
BattleCruiser:
These ships are the heart of the fleet and are normally setup to tank as much as possible, rather than focusing on dmg. Their extra high slots should be used for a T2 Improved Cloak and some form of remote repair (shield transporter, remote armor rep). If you aren't getting hit, you can remote repair someone who is, and the cloak is great for ambushes (I will discuss this tactic farther down).
BattleShips:
These ships are the primary damage dealers of the fleet. They are extremely slow and should be setup with the best tank possible, light and EC-300 wings to take out warp scrams. On any BS other than sniper ships, they should fit a Improved Cloak II and Remote Repair Module to their extra high slots.
Assualt Ships:
Designed to have an excellent set of resists and be able to out fly most damage. These ships are designed for solo ops or fleet ops for taking out smaller ships. Should fit a Warp Scram and Afterburners.
Heavy Assault Ships (HAC):
Heavy Assualt Ships or HACs (Heavy Assualt Cruisers) are setup with an excellent set of resists and are designed to out run any other damage. Can run solo or in fleet. Should fit a warp scram and afterburners. Excellent for taking out frigs and small ships if fitted with assualt launchers. Overrated for taking out larger ships.
Command Ships:
Heavy Assualt Battle Cruisers with the focus on Command. Great resists but the missing mid and low slots over say the Drake makes it worse of a tank. If you're running more than one command module, the command ship is definately worth it.
Interdictors and Heavy Interdictors:
Interdictors can drop warp bubbles in low sec and are setup with similar resists to the Assault ships. The Heavy Interdictor is the HAC version of the interdictor and can also drop a warp disruption field, which is a field around the Heavy Interdictor which people can not warp away from. Very deadly ships and are normally the prelude to a larger fleet attack.
Interceptors:
Interceptors have two roles. Tackler and Interceptor. Tacklers orbit the target and lock them down (warp scram). Interceptors (role) fit for combat to take out tacklers. Both roles should fit MicroWarp Drives, Warp Scram, Afterburners, and Inertial Stabilizers. These ships can normally out run any enemy fire.
ECM Ships:
These ships focus around breaking the enemies target lock. This is done with ECM modules (Electronic Counter Measures). Most balanced fleets have a couple of these ships. Examples of these ships are the Scorpion and the Blackbird.
Logistics Ships: These ships are dedicated remote repair ships. They are HAC based and they can repair at great distances. They are usually unneeded depending on the number of spider tanks in the fleet, but are very handy in a pinch.
Crash Course Pt. 2
Nov. 3, 2009, Lyphar
Symbols and abreviations are used through out EVE. Here are some of the most common ones:
o/ - wave, used instead of hello often, "o" is guy's head, "/" arm waving.
o7 - salute, similar to wave.
atm - at the moment.
otw - on the way.
BS - BattleShip
BC - BattleCruiser
HAC - Heavy Assault Cruiser
AS - Assault Ship
AB - AfterBurner
BPO - Blue Print Original, Original blueprint which copies can be made from and unlimited runs.
BPC - Blue Print Copy, Copy of blueprint used for research or limited number of runs.
POS - Player Owned Station
MOM - Mothership (note: being relabeled as Super Carriers next expansion)
There are a bunch more that I know I'm missing but those are the most common ones. Now hopefully you will understand now
when we're talking in code.
Crash Course
Nov. 2, 2009, Lyphar
Alright I realize that because of the age of some of our new characters, I have to explain the mechanisms of EVE.
So listen up and listen close.
Ship's Tanks and Weapons
- Amarr - Armor Tanker, Laser Based
- Caldari - Shield Tanker, Missile Based
- Gallente - Armor Tanker, Hybrid Turret and Drone Based
- Minmatar - Shield / Armor Tanker, Projectile Based
Find your race above (or the race's ships you wish to fly) and stick with those tanks and weapons. NO ONE should be
putting a shield tank on an Amarr ship or Armor tank on a Caldari ship. Here are the reasons why:
1. All ships give bonuses to their race's tank / weapon / damage type ect.
2. All ships have the right amount of powergrid and CPU to fit the right kind of tank.
3. You will get ganked extemely fast if your ship is not fitted properly.
Now there are always exceptions to this rule. There are drone based Amarr ships, Hybrid based Caldari ships, ect.,
but for the most part your tank will ALWAYS match your race.
Similarly different sized modules, rigs, drones are for different size ships;
Small Ships:
Frigates
Destroyers
Medium Ships:
Cruisers
BattleCruisers
Mining Barges
Industrial Ships
Large Ships:
Battleships
Captial Ships
Small ships should have small modules, med. ships / med. modules, ect. I DO NOT want to see small modules on a BC.
All afterburners say what ship size that they are used for and each ship has what rig size it takes on its modules stats.
Tanks
Passive Shield Tank:
This is my prefered ship setup for PVE. This ship works by extending the shields, improving the shield recharge time, and
adding resistances to the shields. The resistance decreases the amount of damage you take and the improved shield size and
recharge time hopefully outlast the amount of damage that you take. Most Caldari ships give bonuses for this tank by "5% to
shield resistances per level". An example of this is my Drake setup (update: THIS IS THE ULTIMATE DRAKE SETUP):
High Slots:
6x Heavy Missile Launcher II
Med. Slots:
2x Invunerability Field II
4x Large Shield Extender II
Low Slots:
4x Shield Power Relay II
Rigs:
1x Anti-EM Shield Reinforcement
2x Core Defence Field Purger
This ship has about 22,000 shield HP, recharged over 324 sec. with lowest resistance of EM: 65%.
I'll add the exact stats later.
Active Shield Tank:
This setup is used by a few Caldari Ships, and most Mimatar ships. The setup functions by an active shield booster, cap rechargers
(to keep weapons and booster going), and usually some shield extenders. The Caldari Raven is known for using this setup, but I have
no example.
Active Armor Tank:
What defines an active armor tank is that it has an armor repair module online. Any other modules can vary. Normally an armor tank
will have a few armor plates (armor extenders), general armor resist modules, an armor repair module, cap rechargers, and CCC
(Capacitor Control Console) and Trimark Armor Pumps for rigs. As your skills increase you should be cap stable without the CCCs and
trade them all for Trimarks.
Passive Armor Tank:
This setup is used ONLY for PVP. Designed to have the highest amount of armor possible and no armor repair module. This setup uses
the shields as a buffer between the armor taking damage. The idea of this setup is to deal more damage to the enemy before they can
wear down your armor. I have seen this setup successfully flown on an Amarr Abbaddon and more. Ussually has low slots full of armor plates,
mid full of cap rechargers (possibly one afterburner) and rig slots full of trimark armor pumps.
True Passive Shield Tank:
This is a new setup I have been testing out for the past month. I have optimized the ammount of shields on the drake over how fast they recharge.
The reason for this setup is that Invunerability Fields take cap (no matter how little that cap is) and if you are totally cap drained in a
fight, the invun. fields go down and you loose half of your tank. This setup is designed to be TOTALLY cap neutral.
High Slots:
6x Heavy Missile Launcher II
Med. Slots:
4x Large Shield Extender II
2x Shield Recharger II
Low Slots:
4x Shield Power Relay II
Rigs:
1x Anti-EM Shield Reinforcement
2x Core Defence Field Extender
The result is 30,000 Shield HP recharged over 280 sec. The idea came from the Abbaddon Passive Armor tank setup. There are a few
passive resists on the ship and I have been testing it out in PvE and PvP for about a month and I have found that it may be better than the
Passive Shield Tanked Drake.
Skill Training
Should you not have done so already please download EVEMon.
This is the greatest tool for ALL EVE Pilots. It allows you to plan out your skill training for years at a time as well as
recommending what learning training to train to cut down on train time, what skills are needed to fly a ship or use equip, and more.
First thing all new characters should do is open EVEMon, make a year+ training plan (try adding training for a capital ship even if
you are not going for one) and then train all learning training EVEMon recommends. After all the learning training is done go back
into EVEMon and Optimize Attributes for the plan. Then remap your character's atrributes to EVEMon's Optimized Attributes. Time is
skills and EVEMon will save you months of training.
Salvaging
New Characters are always surprised about the sheer amount of money that older characters rake in. If you aren't a crazy miner,
salvaging is the next best way to make a fortune from mission running. Salvaged components can be used to manufacture Rigs or be
sold at very high prices. Salvaging will double the money you get from a mission guarantied.
Drones
Alright drones are more complicated than any other type of weapon system. There are many MANY types of drones and they all serve
various different purposes.
- Light Drones - ONLY drones that will catch frigates. I don't want to see anyone sending heavy drones after a frig.
- Medium Drones - Good drones against Cruisers and BSs
- Heavy Drones - Good drones against BSs
- Sentry Drones - Excellent drones against Cruisers and up. Immobile drones that are a platform turret.
- ECM Drones - Jamming drones. Break enemy's target on you. Good in a sour PvP position.
- Armor / Shield Repair Drones - Repair drones for Armor or Shields. Good for missions and fleet ops.
Each drone has its purpose and should be used as such. Most normal ships can't carry many drones, so drones should be used as an
EMERGENCY countermeasure. You should have at least 5x light drones (pref. Warrior IIs) to take out frigs or 5x Hornet EC-300s (ECM) to
take out Warp Scrambles before any other drone. Should you have the ability to carry a lot of drones you should sort drones by type into
groups of 3-5 drones called "Wings". Label these groups as "Size of Drone (Type of Drone) Wing #" so that you can easily find what drones
to launch in a pinch. If you need a few wings for emergancies at the top of your list, add a # at the front of the label. Examples:
"Med (Hammerhead IIs) Wing II" - Medium sized drone, "Hammerhead Tech 2", Wing 2.
"1 EMERGENCY (Hornet EC-300) Wing I" - Emergency Wing, "Hornet EC-300", Wing 1. 1 at begining of label will put at top of list.
Take a look at the wing setup on my carrer (old image) on the far right. Carrier is a capital ship entirely drone based so I need instant
access to all my drones.
Frigates
Destroyers
Medium Ships:
Cruisers
BattleCruisers
Mining Barges
Industrial Ships
Large Ships:
Battleships
Captial Ships
6x Heavy Missile Launcher II
Med. Slots:
2x Invunerability Field II
4x Large Shield Extender II
Low Slots:
4x Shield Power Relay II
Rigs:
1x Anti-EM Shield Reinforcement
2x Core Defence Field Purger
6x Heavy Missile Launcher II
Med. Slots:
4x Large Shield Extender II
2x Shield Recharger II
Low Slots:
4x Shield Power Relay II
Rigs:
1x Anti-EM Shield Reinforcement
2x Core Defence Field Extender